Showing posts with label Work Bench. Show all posts

Friday, September 16, 2011

GER Mac K - Part I

My efforts for this evening.  Not the traction engine - it has been on blogs before.  No, the Masterclass Models GE/LNER Mac K on which it is sat.  Unfortunately, I don't have any buffers or these would have been included.  As you can see, one of the DG's is fitted - the latch end.  I haven't put the bar end on yet.

I purchased this kit from Shop 2 simply because it is a GE kit.  When I got it, I had a look at the etch and thought gloat box for a bit.  Tonight however I got it out because my original plan for the evening, building a chassis to go under an NGS MR van kit, wasn't going to happen because I have a 9' chassis and I need a 10' Peco replacement.  So I had an evening with modelling mojo present and nothing to do...

A bit of a rummage round presented either the above or the pair of LNER Toad E's I have, also for the W&U collection.  I have a quick look at the destructions for the Mac K and decided it wasn't all that bad and so sallied forth.  The picture above is the accumulation of 2 hours solid work - only one cup of tea was harmed in the making of the model.

The destructions suggest fitting DGs is interesting.  Certainly you can see how I have bent it upwards but it couples and uncouples from the test wagon so it can stay that way.  I folded up the mounting plate behind the buffer beam and then filed a bit off the buffer beam down to the mounting plate before putting the DG on, having cut the mounting bit on the DG quite thin. 

The traction engine is the Fleetline/Skytrek one, minus the roof (Trevor the Traction Engine doesn't have a roof - he also maybe a different model but Rule 1 and all that!).

Tuesday, August 9, 2011

GER Cattle Wagon


Above is my build of the 2mm SA GER Cattle wagon kit running on the recommended chassis.  I don't have any buffers (NYA or TOS seems to be the issue there) so it isn't ready for painting yet.  I have managed to work out a system for DG couplings and these are fitted and work on the test bench so very please with self for that.

The original build didn't use the wire you can see in the photo but rather the pink monofilament stuff you get (got?) in Ratio signal kits for forming the handrails.  Following discussion on the 2mm VAG I changed this for 0.25mm wire which I fitted by drilling holes in the ends and threading through, fixing in place with super glue.  There has been some discussion on the view of the inside - I tried without any success to take a picture of the inside but will have another attempt with daylight rather than flash tomorrow (it being just after 2100 here as I type).  I do know one thing - when you hold the finished product up to the light, you can almost see though the side planking so I think it is a bit too thin to do much with - there is the option of gluing styrene strips on the inside to look like planking if it is something which matters to the individual.

The side of the chassis in shot has the brake shoes - the other side is shoeless and leverless as this is what the photos provided to me by members of the VAG show.  I wasn't particularly surprised at there being only 2 of the 4 wheels braked but I was surprised that the lever is only on the brake side, not on both.  Someone will doubtless tell me if I got it wrong - the pictures are old after all...

Tuesday, July 12, 2011

UFOs

Another episode of UFO sightings tonight.

As mentioned, I got a package of stuff from the NGS shop before their annual holiday and it contained a number of packets of transfers - one being MMT593 for Catfish, Dogfish and Mermaids.   I had obtained from various sources 7 Dapol Dogfish which I have painted black so they all match (this being the easiest colour to do so with and thus making them useful for most of my eras).   Naturally those repainted had no numbers and those which I didn't need to paint had the same numbers (yes, I know there were a number of options but I didn't end up with a variety of black ones) so to make things simple I removed the numbers from the 3 black ones as well thereby meaning I had to transfer all 7.  I had a look at Paul Bartlett's site as a means of checking where to put things as the two books I have with Dogfish in them have them in Dutch so not helpful.  As expected, there were a couple of useful shots there and so on with the project. 

To put 42 transfers on takes a bit over an hour I discovered - now all I need to do is a "bit" of weathering, make up some loads and job done.  In the meantime, I have replaced the Rapidos with short and medium shank Unimates from Red Caboose (sadly, these no longer appear to be available - very handy for close coupling fixed rakes on non-NEM stock) which makes the Dogfish handed.  The end wagons still have a Rapido fitted at the outer end to enable any brake van or loco to haul them.  I suspect they will most often be seen with an 08 (either Blue or Black when the Black one becomes available) and a Shark.  As it stands the control wheels are all at the same ends of the wagon - I might change a pair around for varieties sake.

Friday, July 8, 2011

Sealion


About a week ago, a parcel arrived from the NGS Shop which contained one of their NGK004 Sealion brass kits.  I had purchased one about a year ago but had managed to turn it into a learning experience rather than a model - I discovered that my then soldering kit wasn't up to something like this but was more suited to wiring control panels and the like.  Since the 1st kit, I have obtained the DSE temperature controlled iron and built a few more etched kits so I revisited the scene of one of my heroic failures and had a second go.  Result above.

I am now in the position of trying to work out how to best fit the bogies.  The kit was designed with, I think, Micro Trains bogies in mind (as these were what you could get) but now the NGS has their own bogies and these were included.  A dummy run suggests that the ladders or hopper are going to get in the road so not sure if I did something wrong yet.  More to come.

Saturday, June 18, 2011

Trees - Part I

Amity has been asking me for a while to show her how to make trees.  I suggested that we could make a tree each but she felt it would be better to watch how I did it first rather than do it in tandem.  So last night I made a start and she took photos of the process.  It isn't a particularly original process but maybe of use to some to see it in pictures, rather than merely a description.

The first thing you need to do is gather the materials...  the flavour of the chocolate is up to the builder!  The source of the copper wire is an old multi core mains flex which I acquired sometime in the 1990s.

Cut off enough wire of a suitable length to place around a nail - in this case I used three bunches to surround a 2mm nail.

I found I needed plenty of flux - fortunately I use a flux paste so it doesn't run everywhere.  I suspect with cleaner wire, less flux would be necessary but there was a lot of oxidisation as the wire had been exposed for over 10 years to the elements.

Remember that copper conducts heat very well...  I have a temperature controlled iron which I had set on 370C as this tends to work the best for me.  I probably could have gone higher at the base of the tree as the amount of copper was acting as a bit of a heat sink and the nail definitely was.

Once you have the nail in, place the tree in a block of wood with a suitable sized hole drilled in it. From here you can start forming the tree.  The 3 bunches are quite easy to see here.

Once you have got the main trunk to a suitable height (in this case 15-18 scale feet in 2mm scale) you can start forming the branches.  As you will see in Part II (hopefully Monday - work is going to get in the road this weekend) I will add some lower branches later.

The main branches are formed by dividing the bunches.  As I had three, it was easiest to have three main branches of the tree.

The main branches get divided down.  Depending on the location of the tree these sub-branches may be lop-sided.  As this one will probably be a stand alone tree, the growth is fairly even but a little bit more on the southern side (where it is nominally the sunniest - but this is England after all so sunny is arbitrary!)


So the end of a couple of hours (with distractions) sees the tree with three main limbs and 9 sub-limbs.  From here it is a case of divide and spread out - which will happen in Part II.

Tuesday, May 24, 2011

Photo update - 24 May 2011


Only one photo of the 6 UFOs which are now FOs.  The pair at the back are Gresley D113 BGs - the blue one from the NGS kit and the red using Ultima sides on a Minitrix donor coach - which needed some hacking to sort it.  I had the sides for years and a damaged coach turned up one day on a second hand stall for a fiver (dollars, not quid) but it wasn't until I had built two NGS kits (the other is also red) that I got a roundtuit and then discovered it was a 113 as well...  The bits of white are the Krytal Klear windows which I put in after finding the glazing in the 2 NGS kits didn't quite make it around 3 models!

The front row, from left to right, is my NGS Shark, now with a coupling - a staple glued under one of the ploughs which enables it to connect to anything with a Rapido - doesn't seem to like the Unimates some of my stuff has for closer coupling.  The other end is waiting for a screwlink coupling and a lamp but other than that it is finished.  The Dogfish which is next has a Unimate at one end and a Rapido at the other.  The rest of the rake has Unimates (short one end, medium the other so they have to be put down the "right" way).  It is in this photo due to having a load fitted.  Not convinced as to the realism of the shape but the colour is OK.  I will see how I go living with it before I do the other 6.  Third from the left is the Farish PoW Horsebox now on a Peco chassis - I haven't put lifting arms on it yet but they are around here somewhere.  Last is the fixed Farish cattle wagon - one of the bars had gone missing so this was replaced with some 0.2mm nickle silver wire I had left over from the cattle dock.

Not much really but a couple of hours work and 6 more things of the UFO pile so that is something.


Friday, April 15, 2011

Weathering Wagons

A week or so back I posted about almost finishing two W&U trains and mentioned that the 16 tonners for The Last Tram needed to be weathered.  Tonight they were.  The one of the right is to demonstrate the before look (obviously!) while the one on the left was done using my preferred Tamiya stuff - in this case the B pack.  I am pretty sure they were empty on the last run from Upwell to Wisbech and as such the interior probably needs a bit more - presently it can best be described as grime but I am thinking of doing some shiny bits by dry brushing some silver then weathering again - coal having scrapped the bottom/sides as it was emptied for the last time.  Good idea or not?  Would love to hear some thoughts either as comments or via email.

Wednesday, March 30, 2011

Photo update - 30 March 2011

As promised - albeit a little late - some photos of progress.  First up the SR Brake.  Very pleased with the kit build - not entirely sure the paint job is up the to standard.  I will see how it goes - at least stripping Nickel Silver isn't as worrying as stripping plastic!
Second - the LNWR signal box.  I haven't including the shot of what I am wanting to copy - and there is a bit of a way to go.  I am quite pleased with painting progress on this and I am hoping to have it finished (and possibly a little diorama for it) by Easter.  Interior is merely primed - I am going to fit it separately as I want to paint the levers to match what the leaver diagram for St Alban's Abbey was even though the box isn't accurate.

Saturday, March 19, 2011

Cattle Dock Part IV

Progress on the cattle dock has been slowed owing to breaking the last of the fine drill bits I was using for it.  Annoyingly I had managed to get though half of the posts on 2 bits - one ended up blunt after a short time but the second soldiered on quite nicely.  Then in the space of 5 holes, I broke it, and both the replacements!  Not happy.  Many naughty words. 

So the state of play is I have gotten three more posts done from the last photo and I am one post away from having to make a decision about gates.  Still haven't worked it out - but since the ordered replacement drill bits have been on the way from Hong Kong (although a .com.au shop... so a bit bemused!) since the 8th of March I am hoping to get back into it later this week.

The funny thing is I was looking though my Oakwood Press book on the W&U tonight and discovered the Upwell Cattle dock is very similar to what I have designed.  So I guess it isn't as freelance as I thought!

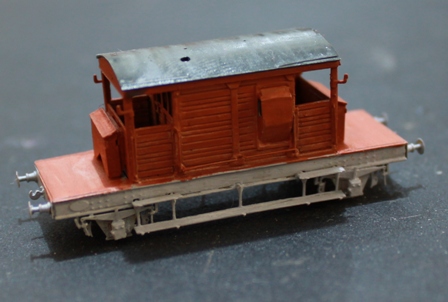
SR Dia 1579/1582 Brake Van

2mm members hopefully will recognise this - David Long advertised this kit in the most recent Magazine.  It appears a van of this type is the end of the last train from Upwell to Wisbech on the 20 May 1966 so naturally, it was on my list! 

Mine arrived early last week but I wasn't able to do much with it until I had printed the 18 pages of comprehensive instructions (or destructions - even DD1 calls them this, much to her mothers chagrin).  Having printed and then had a quick look, the pages were put aside as my parents, sister and eldest niece arrived for the 2nd birthday of DD3 on Friday.

Given that Footy Season is just around the corner, and having waved our guests goodnight, I had another look with the view to making a start in front of the first game on Thursday coming.  However, I decided that things appeared pretty straight forward, so a start was made last night, and further progress in front of the Pakistan v Australia pool game in the longest World Cup of all time.

The photo at the top shows what I started with.  The one at the bottom is were I am now - which is at the bottom of Page 9 not having started on the underframe assembly.  David mentions that he had trouble putting the verandah doors on - I had no dramas but I use a paste flux and tend to find this will help things stick to where you want it.  I suspect solder paste would do something similar.  As I thought on the second read through, it is straight forward, nothing has needed fettling - in fact the only "issue" to date was all my fault - I folded a 180d fold the wrong way and didn't realise until I had soldered it down... naughty words and a 15 minute delay and everything was back where it should be.  Hopefully some of the chassis tomorrow. 

Saturday, March 12, 2011

Cattle Dock Part III

This week I have been plugging away drilling 5 holes per post.  As I don't have my bench drill here in Longreach, this has been done using my pin vice and fingers!  It takes around an hour to do the 5 holes - 0.3mm drill for a 0.2mm nickle silver wire.  As you can see in the photo the holes haven't all lined up - I have been using a jig - but I suspect the lack of true verticalness in the drilling has played a part.  There is still some tidying up and tweaking to do on this lot and I am hoping by the end of the weekend to have gotten around to the next corner - only 3 posts to go on this run! 

I still haven't sorted the gates yet.  I have thought of using thinned down Peco level crossing picket gates or using the Ratio cattle dock kit gates like Missy did.  I have also thought of adapting some M&GN gates which David E sent me.  Not sure - any suggestions would be appreciated!

Wednesday, February 23, 2011

Bother...

I had planned on doing something about my coal merchants this evening however when I went looking for my collection of Scale Scenes papers to do the concrete pad on which the purveyors of Black Diamonds will ply their trade, I discovered I don't have any.  So I looked on the computer to further discover that I hadn't gotten around to purchasing the relevant sheet from the scratch builders section of the site.  Bother.  Since I will need to print the page at work, I will put the project back a day.

The second of the coal merchants (I found that somewhere like Grassington & Threshfield has about 8 merchants working from the yard so I thought 2 wasn't unreasonable) will have staithes.  I have been considering how to build these.  One option I thought of was to use surplus sleepers held together with short lengths of rail.  I don't know if that would be used over there but I have seen retaining walls here which have been built of sleepers and short lengths used to give added strength.  The alternative was to use some of the plastic card I have which I used to try my hand at wagon bodies.  In any event, this didn't get off the ground either so looks like a busy night tomorrow as I will be away for the weekend in Brisbane - the plus of this being I will get to a shop which sells brass tubing and what not and I have a shopping list for TOUs and fences for cattle docks. 

Monday, December 27, 2010

Oxford Diecast Horsebox

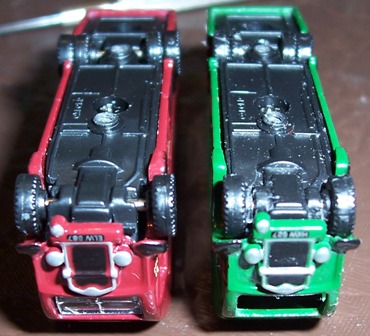
Amongst the various bits and pieces I received for Christmas was three models from Oxford Diecast which were given to me by my parents.  One of the three was the Southern Railway liveried horsebox and as it happened a couple of days before Christmas the December/January Magazine from the 2mm Association arrived.  This contained an article by Matthew Wald in which he explained how he had modified the Oxford offerings of both the mechanical horse and horsebox in LNER livery for Copenhagen Fields.  Given that I didn't really have a need for a SR liveried horsebox (an LMS one now...) I thought it would make a good guinea pig to try out what Matthew did for myself.


The first thing to do was to take the horsebox out of its box and dis-assemble it.  Like Matthew I found the glazing didn't want to come out neatly and so it is the pile on the right hand side.  Apologies for the poor quality of the photo below but I had finished the project before I looked at the photos on the computer or I would have taken a better one.  For the benefit of readers who aren't members of the 2mm Association, the wheels need to be cut out of the chassis.  For the steering axle at the front, this I found was easiest by folding the seats forward and nicking the two bits of plastic holding the axle in.  For the 4 wheel driving axle, this was removed by slicing from below.


The main surgery is in shortening the axles.  For the fore axles I cut in half and then filed down the ends.  I also filed the chassis a bit, offering the whole up to the body until I was satisfied the wheels were now sitting in the wheel arches, and not protruding.  The aft axle I was able to take the wheels off, file the wheels down at the back, drill the hole a bit deeper and reassemble it all.  Again, offer it up to the body in the chassis until satisfied with the fit.


Once happy with the axles, reassemble it all and glue the wheels in.  The photo below shows the SR one next to an unmodified BR liveried horsebox.  It shows the changes to the wheels very clearly and demonstrates why it is worth the time.  Speaking of time, this was the work of the lunch break during Day 1 of the Boxing Day Test - and a Test which wasn't worth watching if an Australian supporter!


Matthew filed clear plastic to fit for the windows.  I used Microscale Krytal Klear.  The side windows were straight forward but after a couple of goes with the windscreen and not being happy with it, I eventually filed around the original and stuck it in place with the Krystal Klear.  Prior to doing the windows, the body was painted with Humbrol 49 - Matt Varnish.  Any similar product will do the trick and the timing in the process is arbitrary.  It certainly helps to take the "toy" out of the model.  I plan on giving mine a light weathering too.


So the finished model.  Remember that at NVD the windscreen looks a lot better.  It wasn't until I was looking at the photos that I noticed the fogginess.  Having done this, I plan on doing the BR one to match and then looking at the other Oxford offerings to see what can be done - perhaps wing mirrors?  I haven't found a good enough photo to see the position yet!


Friday, October 8, 2010

The Henry Ford approach to WOMWB

I had an evening of "me" time - Amity was out at her monthly scrap booking club get-together - and so I could take over the dinning room table with my "stuff". As we have a dining room table which seats 10, the amount of "stuff" which one can put on it is considerable!

This evening's work consisted mainly of painting - the appropriate spill avoidance measures were taken, even in the absence of Management as I have no wish to cause trouble - some of the UFO pile and varnishing the items which have recently been transferred to seal in the transfers prior to weathering.

It also consisted of putting my brand new Farish Std 4 2-6-0 which arrived today on the kids oval of Kato to run it in. Very impressed with the loco - not too impressed with the gap twixt loco and tender, even the supposedly short version of the link so will have to work out how to make a shorter one.

Taking the Ford approach makes this fairly time consuming job move along more quickly - although I didn't take it to the ultimate approach and paint everything black (although I could see the appeal as I stirred the umpteenth little tin of paint!). It does require a bit of organisation however to get it working well.

My approach - and this is why a large dining room table helps - is to group things together with other things needing to be painted the same colour. For example, a pair of TPM HEA hoppers which I am painting BR Bauxite were paired with 3 MLS Shock wagons from the NGS, some Peco Tube wagons and a Peco cattle wagon as these were all being painted the same. The tin was added to the collection along with a good No 2 brush (bad brushes are sent to the weathering box to be used for more messy tasks).

Other colours lumped up were Black, BR Wagon Grey, Roof Grey, White, Matt Varnish and Yellow. In the end, I didn't do the white as I hadn't gotten things entirely sorted and the white ended up not being where I started so by the time I got to it, the jar of white spirit (turps to Australians reading - and before you shudder, consider where I am and how far a good hobby shop is and what the rules are for posting said better thinners via Aussie Post...) was a bit too grubby for me to want to put the White Paint Only brush in it.

Everything else was done so I am well pleased with the evenings work - although I haven't photographed it as where it is, is not in the best location for photographing and the flash tends to be too much. I will, however, organise a group portrait tomorrow to show what I have been doing for October. I am also planning on weathering my FNA wagon tomorrow and will definitely take photos of that and post a "show you how I do it" blog entry.

Saturday, October 2, 2010

Return of the UFO Box

Got back from Brisbane after a short 12 hour drive (normally closer to 13 hours so happy with the run!) on Wednesday and didn't do anything train wise other than unpack the box on Thursday. Part of the reason for the trip down was for me to do a stock take (which turned up a few locos which I hadn't listed and an increase in the UFO box!).

Friday night therefore had the transfer kit out and a start made on the UFOs. In this case, I fixed the numbers on one of my Std 4 tanks (80103 - missing a 3) and A4 60012 (although I still can't photograph the pair as the other is in Brisbane!) which needed one of the 2s fixing.

Next I made a start on the pile of un-numbered locos. I have had a pair of 8Fs waiting for numbers for a few years now and I went through my database to find some suitable numbers. As a result I picked 48421 and 48536 as I have pictures of both of these locomotives pounding up the last few yards to Ais Gill summit. As this is the intended location of my next large exhibition layout (I am going to have enough space that the refuges will be included at full length of 33 wagons) it made sense to do these.

Next on the list was renumbering one of my two 4Fs (can't see much point in having two 44370s). I had a quick read about them to find that until 44207, they were right hand drive. This narrowed the choice and I had a look to see what digits I had a lot of. First up I thought 44561 as this would be useful to run on Ben Lawson's Sturminister Newton layout (the only pic of a 4F on the S&C was a RH drive version - the Farish model is LH drive). Then I discovered (just in the nick of time) that the proposed number belonged to one of the S&DJR quintet - and they were RH drive too! I moved the number up two to 44563 - one of the 1927 LMS build locos authorised by Stanier.

Next on the list is finishing off my pair of Garratts (one side done, other side needs to be done on both 47975 and 47982), putting the name plate and numbers on D9020 "Nimbus", finding the picture I have somewhere (not logged on the database yet - curses!) of a Q1 hauling a rake of bogie ballast hoppers and a Shark to renumber my Q1 from 33030 to whichever loco it is, and sorting out Class 04 No 11217 to become 11102 for the W&U Tram - although the front windows will be wrong.

After that - there is a whole fleet of GWR locos needing number plates and an Ivatt 2-6-2T needing lining and numbering. Then there are the wagons. So I will be busy for a few weeks with that lot.

Saturday, September 11, 2010

My workbench - soldering kit

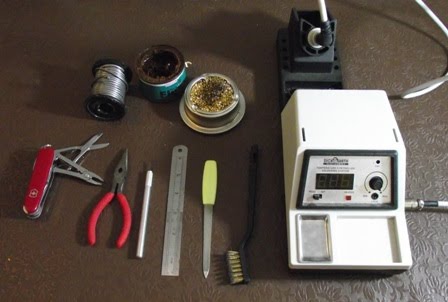
Recently I was talking to one of my mates in SE Queensland who was telling me about a gathering of British Railway Modelers of Australia members (I am the Central Queensland Unit) and they had a discussion of tool kits. This got me thinking and some posts to both the 2mm VAG and N Gauge Yahoo group about kit prompted this blog.

The photo shows what I use to make the various etched kits which are shown on here. Starting with the DSE solder station and moving clockwise there is a brass brush ($2 for a pack of three brushes - one brass, one steel and one nylon at Crazy Clark's - the Australian readers will know about this mob. I don't know of the International equivalents but below Aldi on the food chain of quality gear!); a old nail file - the type with sand or industrial diamonds impregnated rather than cuts in the metal; a 6 inch steel rule; cheap knife from Crazy Clark's - I break blades too frequently to get expensive ones - this was $2 for a handle and 10 blades (currently I still have all 10 so I mustn't have used this one to open a Humbrol tinlet...); small pointed nose pliers; the must have Swiss Army Pocket Knife - in this case one with pliers and the scissor are used to cut things from etches; the roll of solder - don't know the composition as I have had it for ages and the tag is long gone; some flux paste; and a brass scourer to clean the tip of the iron.

The only bits of this kit I would describe as "flash" is the solder station (and possibly the pocket knife, but I can hear the shudders from the purists from here - wild colonial boy moi???). The rest is pretty run of the mill stuff. The nail file was nicked from my mother over a decade ago, and is starting to wear out - not bad for 10 years of various kits (mostly plastic) and now brass and nickle silver. The other bits are what I can find out here. I have thought about the more expensive kit and I believe the posts which say once you try you won't go back, but I think of the pioneers in 2mm (N or Fine Scale) who "made do" and figure, if they can, so can I. So I do.

No actual modeling has gone on this week - too much (excuse me) work. Next week won't see much happening either as I will be away for (excuse me again) work. However, I will try and be awake enough to do something next Friday - transfers probably as there are a few things which need doing before the AMMC from BRMA (Q) the following Saturday in Brisbane.

Saturday, September 4, 2010

Toad 2

So hand rails are on - the small ones worked well, the large ones, well the picture makes it look worse than it is. NVD I am happy with it. I used a jig made using the sides which I didn't use in the kit and some track pins, wrapped wire around and then soldered it, before transferring to the sides. The large didn't quite fit so was fettled. Some may have gone back to square one but I am happy with the result. Chimney ex-Minitrix Warship buffer filed down and drilled out.
Depending on the weather tomorrow, it may get painted. I am planning on entering it in this years BRMA (Q) Annual Model Making Competition.

Friday, September 3, 2010

AA1 Toad

I have been building this over a period of 3 or 4 nights so far - the chassis was pretty easy as was the superstructure of the body. The detail has been fiddly but worth it. The lamp irons (you can see the side one in this picture - it has a matched one on the other side and there are ones on each end) are spares from my J70 kit. The end ones have been twisted to look more like GWR ones than GER ones. Hand brake spare brake wheel from something or other.

Sill have to sort out the hand rails on the sides and the chimney. Then paint (GWR Grey) and transfer and await the arrival of the Materson 3 links I have ordered and connect it up to the P19 rake it will back stop.

Sunday, August 29, 2010

"Jaws"

As reported, the mission of Friday night was accomplished. The mission of Saturday was also accomplished, up to a point. The photo shows "Jaws", the first BR Shark kit from the NGS. I suspect it will be joined by "Mako" in due course as I can see a 'need' for a second at some point. Still to go are the plough guards, brake pipes and some detailing which I am going to add to the underframe.

Specific inspiration for this one is from this pic http://gallery6801.fotopic.net/p24727758.html I am not sure if the MMT pack from the NGS contains these markings but I guess that doesn't matter - it is more the inspiration which matters, rather than the specifics.

As far as the rest of Saturday's ambition goes - the LNWR van got as far as the first Humbrol 79 coat, the two TPM HEAs got their first coat of Precision BR Bauxite and the GWR AA1 Toad had its chassis built. Some photos of one of these to determine the windows would be good but I can't seem to find any - currently thinking of doing "sash" type with a glazing bar in the mid point - suspect I will find none ever had this feature if I do however! If you do know, send me a message...

Friday, August 27, 2010

Mission accomplished - for tonight anyway!

Last night I announced I would have these wagons ready for the paint works tomorrow - and I am pleased to say (to quote Prof. Higgins) I did it.

Two TPM HEAs which are going to be given Precision Bauxite paint jobs for use as barrier wagons with the FNA kit from the same stable, one NGS Shark (with no couplings as the ploughs get in the way and I haven't worked out how to connect it to the Farish Seacow it is going to go around with) and my second 2mm FSA D88 LNWR van - much neater than the first, even if I do say so myself.

So tomorrow these will be primed ready to go in the morning - and given the forecast for here in Longreach, there is a reasonable chance they will be right to have their first top coats tomorrow afternoon while the Ladies of the Residence are out at a party. Anyway, fingers crossed. I have the transfers for both the LNWR van and Shark and I think I have some HEA transfers on a HAA sheet. Not sure, will have to find out. I will put the MMT Codes from the NGS shop up when the painted and transferred stock appears here.

As for the next plan. Well not sure. There is the LNWR coach which has had some progress, a Maunsell R0 which also has had some progress, the assorted Toads, a LNWR Signalbox plus the UFO box. I think, since I am on this roll of finishing trains, the GWR 6 Wheel Toad to go with the Mill Lane Sidings P19s is going to be next.