Saturday, September 18, 2010

Matherson Models Chain Links


Having read about the Mathieson Models wagons and having seen on-line their three link coupling system, I ordered a pair of wagons and some three links to give them a go.

The plan I had was to see if it was firstly possible to use to link up Farish wagons without too much hassle. The photos show the couplings fitted on a pair of Farish 3 plank BR wagons. No modifications have been made to the wagons other than having the coupling boxes removed. The Mathieson couplings have had the fixing lugs fettled by bending inwards to fit and then the whole has been glued in place. I don't think there would be a hassle in reversing the process should it be required.

I subsequently tested a rake of 4 of these (so three sets of links) on a reverse curve of Kato 348mm track and both pushing and pulling didn't cause any hassles.

Other experiments have involved closing the gap (presently 3 mm which is a bit big although narrower than the normal Farish one) and this has been with a Farish PoW wagon. The locating holes for the coupling box are used for a guide and 1.2mm holes drilled aft of each of the holes. This brings the hook closer to the buffer beam but I haven't done another to see how it goes.

The third experiment was soldering a coupling onto the re-chassied Chivers LMS Long Lows mentioned months ago - about the time Mathieson first brought out their links. A bit of fettling and they soldered happily enough onto the DG locations and again, have traversed the reverse curves in both directions. As my layout has a 15inch standard minimum, I am well pleased. Just have to work out the position to the loco now and determine the length of spaghetti which can be handled.

Further pics tomorrow.

Saturday, September 11, 2010

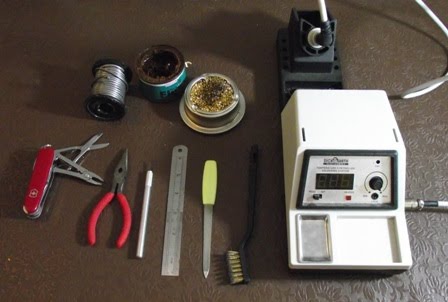
My workbench - soldering kit

Recently I was talking to one of my mates in SE Queensland who was telling me about a gathering of British Railway Modelers of Australia members (I am the Central Queensland Unit) and they had a discussion of tool kits. This got me thinking and some posts to both the 2mm VAG and N Gauge Yahoo group about kit prompted this blog.

The photo shows what I use to make the various etched kits which are shown on here. Starting with the DSE solder station and moving clockwise there is a brass brush ($2 for a pack of three brushes - one brass, one steel and one nylon at Crazy Clark's - the Australian readers will know about this mob. I don't know of the International equivalents but below Aldi on the food chain of quality gear!); a old nail file - the type with sand or industrial diamonds impregnated rather than cuts in the metal; a 6 inch steel rule; cheap knife from Crazy Clark's - I break blades too frequently to get expensive ones - this was $2 for a handle and 10 blades (currently I still have all 10 so I mustn't have used this one to open a Humbrol tinlet...); small pointed nose pliers; the must have Swiss Army Pocket Knife - in this case one with pliers and the scissor are used to cut things from etches; the roll of solder - don't know the composition as I have had it for ages and the tag is long gone; some flux paste; and a brass scourer to clean the tip of the iron.

The only bits of this kit I would describe as "flash" is the solder station (and possibly the pocket knife, but I can hear the shudders from the purists from here - wild colonial boy moi???). The rest is pretty run of the mill stuff. The nail file was nicked from my mother over a decade ago, and is starting to wear out - not bad for 10 years of various kits (mostly plastic) and now brass and nickle silver. The other bits are what I can find out here. I have thought about the more expensive kit and I believe the posts which say once you try you won't go back, but I think of the pioneers in 2mm (N or Fine Scale) who "made do" and figure, if they can, so can I. So I do.

No actual modeling has gone on this week - too much (excuse me) work. Next week won't see much happening either as I will be away for (excuse me again) work. However, I will try and be awake enough to do something next Friday - transfers probably as there are a few things which need doing before the AMMC from BRMA (Q) the following Saturday in Brisbane.

Saturday, September 4, 2010

Toad 2

So hand rails are on - the small ones worked well, the large ones, well the picture makes it look worse than it is. NVD I am happy with it. I used a jig made using the sides which I didn't use in the kit and some track pins, wrapped wire around and then soldered it, before transferring to the sides. The large didn't quite fit so was fettled. Some may have gone back to square one but I am happy with the result. Chimney ex-Minitrix Warship buffer filed down and drilled out.
Depending on the weather tomorrow, it may get painted. I am planning on entering it in this years BRMA (Q) Annual Model Making Competition.

Friday, September 3, 2010

AA1 Toad

I have been building this over a period of 3 or 4 nights so far - the chassis was pretty easy as was the superstructure of the body. The detail has been fiddly but worth it. The lamp irons (you can see the side one in this picture - it has a matched one on the other side and there are ones on each end) are spares from my J70 kit. The end ones have been twisted to look more like GWR ones than GER ones. Hand brake spare brake wheel from something or other.

Sill have to sort out the hand rails on the sides and the chimney. Then paint (GWR Grey) and transfer and await the arrival of the Materson 3 links I have ordered and connect it up to the P19 rake it will back stop.

Sunday, August 29, 2010

"Jaws"

As reported, the mission of Friday night was accomplished. The mission of Saturday was also accomplished, up to a point. The photo shows "Jaws", the first BR Shark kit from the NGS. I suspect it will be joined by "Mako" in due course as I can see a 'need' for a second at some point. Still to go are the plough guards, brake pipes and some detailing which I am going to add to the underframe.

Specific inspiration for this one is from this pic http://gallery6801.fotopic.net/p24727758.html I am not sure if the MMT pack from the NGS contains these markings but I guess that doesn't matter - it is more the inspiration which matters, rather than the specifics.

As far as the rest of Saturday's ambition goes - the LNWR van got as far as the first Humbrol 79 coat, the two TPM HEAs got their first coat of Precision BR Bauxite and the GWR AA1 Toad had its chassis built. Some photos of one of these to determine the windows would be good but I can't seem to find any - currently thinking of doing "sash" type with a glazing bar in the mid point - suspect I will find none ever had this feature if I do however! If you do know, send me a message...

Friday, August 27, 2010

Mission accomplished - for tonight anyway!

Last night I announced I would have these wagons ready for the paint works tomorrow - and I am pleased to say (to quote Prof. Higgins) I did it.

Two TPM HEAs which are going to be given Precision Bauxite paint jobs for use as barrier wagons with the FNA kit from the same stable, one NGS Shark (with no couplings as the ploughs get in the way and I haven't worked out how to connect it to the Farish Seacow it is going to go around with) and my second 2mm FSA D88 LNWR van - much neater than the first, even if I do say so myself.

So tomorrow these will be primed ready to go in the morning - and given the forecast for here in Longreach, there is a reasonable chance they will be right to have their first top coats tomorrow afternoon while the Ladies of the Residence are out at a party. Anyway, fingers crossed. I have the transfers for both the LNWR van and Shark and I think I have some HEA transfers on a HAA sheet. Not sure, will have to find out. I will put the MMT Codes from the NGS shop up when the painted and transferred stock appears here.

As for the next plan. Well not sure. There is the LNWR coach which has had some progress, a Maunsell R0 which also has had some progress, the assorted Toads, a LNWR Signalbox plus the UFO box. I think, since I am on this roll of finishing trains, the GWR 6 Wheel Toad to go with the Mill Lane Sidings P19s is going to be next.

Thursday, August 26, 2010

UFOs

No pictures - merely something to get me inspired for tomorrow and the weekend.

The UFOs are building up again - I got some stuff from the NGS and 2mm FSA as I think I mentioned earlier. This included some TPM HEA kits to flesh out the Nuclear train, another LNWR D88 van, a Shark ballast plough, a pair of LNER Toad Es for the W&U collection and a GWR 6 wheel Toad to run with the P19 wagons. There was also some Shire Scenes bits and pieces for St Alban's Abbey and the Langley LNWR signal box kit.

So the plan is to have the HEAs, Shark and D88 van into the paint shops Saturday which means they all have to be finished off tomorrow night. I have made good progress so this should be achievable.

Saturday afternoon is looking like transfers in front of the footy before more soldering Saturday night, painting Sunday morning and maybe finish the weekend Sunday night with some final transfers.

In any case, having made this claim public I had better do something!!!! The point behind the blog is to keep making progress so...

Tuesday, August 24, 2010

60012

I have always thought it would have been nice if BR had used the names of the LNER Pacifics on the 100 Class 60 diesels - the 34 A4's and first 66 of the A3's which had previously carried 60xxx numbers (the A3's got to 60112).

With this in mind, and being inspired by the Fictitious Liveries website I kept an eye out for a cheap 60 to come up at either one of the box shifters or eBay. Hatton's duly delivered and when the Mainline liveried 60 was up for grabs for under 40 quid (remembering that out here I get it VAT Free) I snapped it up. A dunk in some stripper and a coat of Humbrol 221 Garter Blue Enamel later and some detailing paint on the cab roof (black like the A4's) and the obligatory yellow on the front end and I was set.

Numbers are from Fox as is the LNER crest under 4491. The other end has 60012 and the Arrows. I had thought about putting the BR Steam crest on but ruled it out owing to the LNER blue colour. Nameplates arrived this week from the NGS - Commonwealth of Australia naturally. Just needs the Australian Coat of Arms and all is complete - the 4491 end is detailed from the pack which comes with the loco so at some point I will stick a little man in to drive it. Not sure what will be its usual duty roster - possibly a VSOE set?

A couple of detail pictures below - when the new camera arrives and the A4 is sorted a bit more, I will take a couple of side by side shots of the two longest nameplates to be fitted to British Railway Locomotives.

Now if the 60's had gotten to 60103...


4491 end showing the LNER Crest under the number and the red backed 23 character nameplate. Parts of the detailing pack can be seen under the buffers.

The other end with the BR Arrows. This is the end with the short shank NEM Rapido in.

Sunday, August 22, 2010

MR Meat Van

Saturday was the Australian General Election - being a History/Social Studies teacher, naturally I watched the coverage and while I was watching I did something useful!

As mentioned in previous posts, I was sent a Not Quite Perfect etch of the PC Models Midland Railway Meat Van by Alan at Ultima. The biggest issue was the louvers had not etched though on both sides so there was a bit of work involved in sorting this out. After that, pretty much plain sailing. Again, no instructions but I have found this www.modelrailways.tv/images/catalogue/larger/SW23.jpg which has shown me how to approach the chassis (which isn't attached in the photo hence the gaps!). A few bits and pieces from Shop 2 and I'll be all set. The roof for this one is from the Dia 88 LNWR van - the etch for this comes with a spare which fitted with a trim.

Friday, August 20, 2010

LNWR Horse Box

The most recent item on my work bench - a LNWR 21' Horse Box from the shrunk PC Models etches being offered by Ultima. This is the bits (minus a buffer I notice!) which come in the kit plus 4 bearings and a pair of 7mm wheels from the 2mm FSA. Still to fit is the roof (a spare from the GE Etches from David Eveleigh), the missing buffer (obviously!) and then paint, glaze (not sure how with roof etch to go on but a solution will present - usually does) and so forth. I also need to find a way of doing the axle boxes. Any suggestions would be most welcome.

I am really quite pleased with this kit. Alan is, as far as I am aware, still trying to find the original instructions for this and I put it together with the aid of a photo of a 7mm kit for the same vehicle as mentioned below. It is going to be finished in LNWR livery and used on St Alban's Abbey when I get around to building it. In the mean time, I will most likely fit with a pair of N gauge wheels and run it on St Alban's Priory - or leave it standing in the yard on same as a show piece!

Next project - the LNWR 6 compartment 50' brake from the same source - or possibly the NQP Midland Railway Meat Van which Alan sent me.