Thursday, October 14, 2010

50th Entry

I was surprised to realise that it has been 9 months since I started this blog - and in that time I have made, including this entry, 50 entries. I had a read back at the beginning to see what I had planned and to see what I had achieved.

In one sense - not much. The first entry said that Amity and I were planning a small shunting inglenook style layout in 2mm scale. Since then exactly nothing has happened! The board I drew it out on is too small for the frame I got my father to bring up in June and I haven't done anything about a new board for the frame to transfer the drawing over. So in that sense it isn't good.

However, I read through the rest of the blog and was a little bit surprised as to what I have got done in 2010 so far. The pile of UFOs which are now FOs has grown from the 10 I was challenged to do back in May to be well on the way to 100 now. This has been a definite win as I can clearly see what I have achieved. Other things are less tangible - my soldering skill is now much better than it was when I built my first etched chassis in the middle of last year and I have no fear of any etched kit anymore. My willingness to add to my collection of references has also moved from being the one size fits all to more specific things (my two recent eBay wins were both books on the LNWR - one on coaches - as an example).

All up I think the blog has been a positive thing - it has provided me with a means to stay motivated (keeping it updated means having to actually do something) and this has meant I have achieved much.

For those who have commented both on the blog and off, thanks for the support and encouragement. Putting the map on (I got the idea from Paul Bartlett's site) has been interesting - 30 countries including some I was surprised at.

Here's to the next 50 entries - the next will be looking at something completely different...

Sunday, October 10, 2010

Weathering

Above is part of my weathering kit. (I also have some grey pastel/chaulks and a couple of jars of powders which I used, depending on the job). They are packs B and C of the Tamiya weathering packs - I have looked at A and D but decided there wasn't much call for them. I have also used Humbrol 113 on a dead, dry brush, to put frame dirt on Farish shiny plastic chassis.

This is the subject - my TPM FNA wagon with a sample wagon to copy from which is on page 87 of "British Railway Goods Wagons in Colour 1960-2003 - For the Modeller and Historian" by Robert Hendry. There are other photos on Paul Bartlett's excellent site - see link to the side here and then put FNA into the search box.

The base model has been finished as best as I can in a paint colour close to what it will end up - in my case Humbrol 63 "Sand". There was advice that Desert Sand was a better match but I was unable to obtain it and I made do. Weathering hopefully will get the shade closer to the photo.

Application is very straight forward using the Tamiya kit. I have obtained (via Amity) some extra bits to put the colour on - from the eye wear section of the local chemist. Simply rub the pad into the chosen colour, then apply to the item being weathered. In this case, I used the dirt colour at the right hand end of the B pack. I also used some of the white in the same pack to pick out the corners like in the photo.

Basically my advice is to do it small and slow - build up the colour. The advantage with the Tamiya stuff is it comes off with a baby wipe if you don't like it (wet ones et al - ours is the local supermarket chain brand) without touching the work underneath (which since it has been matt varnished should be the case!). It is important to remember that most wagons spend more time stationary than travelling and as such, the rain runs should reflect this - go from top to bottom, rather than side to side. However, I find when doing planked wagons, it is important to start off side to side as this gets the colour in the grooves and then you can go down (another tip on this is watch out for rain strips on rooves - the weathering is either cleaner, a different shade or darker at the end of the rain strip).

Above all, find a picture of your subject - or something similar if your particular thing wasn't well photographed. Colour is naturally the best but obviously hard to come by for those modelling pre-Grouping or indeed Grouping layouts. No excuses for the Post-Privatisation scene however.

No photos of the finished article I am afraid - didn't get around to it today as I had to change two wheels on the car owing to a pair of flat tyres. No, I only have one spare so there was much to be done in between. Photo tomorrow hopefully.

One I did earlier - I did the 37 and BG last year for Swallow Street using the Tamiya kit and the Humbrol paint on the dry brush

Saturday, October 9, 2010

Photo Update


Photo update - the weather which hasn't been good was OK for photos late this afternoon but is turning overcast again.

First up is the box of things I have been transferring. I know a lot of these are not the most accurate of models but the average punter here in Australia doesn't know that and they work in my shunt trains on St Alban's Priory so Rule 1 and all that.

The top row is a pair of Peco Tube wagons and a pair of Tarp wagons from the same stable. Second row is lead out by a cut down Chivers tube wagon (I ended up with some spare sides owing to a production error with some chassis) on a Peco under frame. This is followed by a cut down Minitrix PoW on a Peco chassis then a Peco 9' open wagon kit. The last is the pair of TPM HEAs I have been building to go with my FNA wagon.

The third row is all Peco - 6 insulated vans, recently transferred using Modelmaster transfers from the NGS (MMT077 for those keeping track of such things. Fourth row is a Peco 15' Insul-Fish (wheel base right, sides and ends OK but stretched!), a Parkwood Insulated van kit on a Peco chassis then 3 Chivers Blue Spot Fish vans - transfers from the Modelmaster range again but this time the MMT088 pack (it includes the blue spots).

The fifth row starts with a pair of MLS Shock Opens - I have to paint the sides white now that I have re-found the transfers as these are from Robbies Rolling Stock and have the colour included. Hopefully the colour on the transfers does match my efforts with the Precision Bauxite. The next wagon is a NGS Mica - it hasn't got all its transfers yet as I am not sure what the lettering on the LH side would be in BR days. Any ideas gratefully received. The last are a pair of Parkwood LNER Fish vans - transfers as before. The bottom row has three Parkwood Palvans - transfers being the MMT084 pack. The last is a Peco cattle van waiting for transfers having been painted.

The collection above is a little bit easier to explain. All have been done using Fox 10inch numbers - FRH2008. Top is 80103 - the crest is the correct Right hand facing crest. 80103 was the first Standard type loco withdrawn and had the wrong "right" crest. Next is 44563 which was explained lower down. Then 48421 and 48536. I am not sure about details such top feed and what not but Farish may produce an updated 8F in the near future and I will worry about it then.

Friday, October 8, 2010

The Henry Ford approach to WOMWB

I had an evening of "me" time - Amity was out at her monthly scrap booking club get-together - and so I could take over the dinning room table with my "stuff". As we have a dining room table which seats 10, the amount of "stuff" which one can put on it is considerable!

This evening's work consisted mainly of painting - the appropriate spill avoidance measures were taken, even in the absence of Management as I have no wish to cause trouble - some of the UFO pile and varnishing the items which have recently been transferred to seal in the transfers prior to weathering.

It also consisted of putting my brand new Farish Std 4 2-6-0 which arrived today on the kids oval of Kato to run it in. Very impressed with the loco - not too impressed with the gap twixt loco and tender, even the supposedly short version of the link so will have to work out how to make a shorter one.

Taking the Ford approach makes this fairly time consuming job move along more quickly - although I didn't take it to the ultimate approach and paint everything black (although I could see the appeal as I stirred the umpteenth little tin of paint!). It does require a bit of organisation however to get it working well.

My approach - and this is why a large dining room table helps - is to group things together with other things needing to be painted the same colour. For example, a pair of TPM HEA hoppers which I am painting BR Bauxite were paired with 3 MLS Shock wagons from the NGS, some Peco Tube wagons and a Peco cattle wagon as these were all being painted the same. The tin was added to the collection along with a good No 2 brush (bad brushes are sent to the weathering box to be used for more messy tasks).

Other colours lumped up were Black, BR Wagon Grey, Roof Grey, White, Matt Varnish and Yellow. In the end, I didn't do the white as I hadn't gotten things entirely sorted and the white ended up not being where I started so by the time I got to it, the jar of white spirit (turps to Australians reading - and before you shudder, consider where I am and how far a good hobby shop is and what the rules are for posting said better thinners via Aussie Post...) was a bit too grubby for me to want to put the White Paint Only brush in it.

Everything else was done so I am well pleased with the evenings work - although I haven't photographed it as where it is, is not in the best location for photographing and the flash tends to be too much. I will, however, organise a group portrait tomorrow to show what I have been doing for October. I am also planning on weathering my FNA wagon tomorrow and will definitely take photos of that and post a "show you how I do it" blog entry.

Saturday, October 2, 2010

Return of the UFO Box

Got back from Brisbane after a short 12 hour drive (normally closer to 13 hours so happy with the run!) on Wednesday and didn't do anything train wise other than unpack the box on Thursday. Part of the reason for the trip down was for me to do a stock take (which turned up a few locos which I hadn't listed and an increase in the UFO box!).

Friday night therefore had the transfer kit out and a start made on the UFOs. In this case, I fixed the numbers on one of my Std 4 tanks (80103 - missing a 3) and A4 60012 (although I still can't photograph the pair as the other is in Brisbane!) which needed one of the 2s fixing.

Next I made a start on the pile of un-numbered locos. I have had a pair of 8Fs waiting for numbers for a few years now and I went through my database to find some suitable numbers. As a result I picked 48421 and 48536 as I have pictures of both of these locomotives pounding up the last few yards to Ais Gill summit. As this is the intended location of my next large exhibition layout (I am going to have enough space that the refuges will be included at full length of 33 wagons) it made sense to do these.

Next on the list was renumbering one of my two 4Fs (can't see much point in having two 44370s). I had a quick read about them to find that until 44207, they were right hand drive. This narrowed the choice and I had a look to see what digits I had a lot of. First up I thought 44561 as this would be useful to run on Ben Lawson's Sturminister Newton layout (the only pic of a 4F on the S&C was a RH drive version - the Farish model is LH drive). Then I discovered (just in the nick of time) that the proposed number belonged to one of the S&DJR quintet - and they were RH drive too! I moved the number up two to 44563 - one of the 1927 LMS build locos authorised by Stanier.

Next on the list is finishing off my pair of Garratts (one side done, other side needs to be done on both 47975 and 47982), putting the name plate and numbers on D9020 "Nimbus", finding the picture I have somewhere (not logged on the database yet - curses!) of a Q1 hauling a rake of bogie ballast hoppers and a Shark to renumber my Q1 from 33030 to whichever loco it is, and sorting out Class 04 No 11217 to become 11102 for the W&U Tram - although the front windows will be wrong.

After that - there is a whole fleet of GWR locos needing number plates and an Ivatt 2-6-2T needing lining and numbering. Then there are the wagons. So I will be busy for a few weeks with that lot.

Saturday, September 25, 2010

AMMC

The Annual Model Making Competition for BRMA(Q) members was held today. Amity and I travelled from Longreach to Brisbane for it (and for other stuff but principally for this) as the organisers deliberately held it during the school holidays (on the AFL Grand Final Day - which was a hassle but the Bombers didn't make the Last Saturday in September so it wasn't too big a hardship - and as the game ended in a draw, they are replaying it next week!!!).

I entered models in 3 classes - Modified RTR locos, Kit or Scratchbuilt Rolling Stock and Modified Rolling Stock. I was very pleased to win all three - particularly the Modified RTR Locos with my modified Farish 04 into Wisbech and Upwell tram style as this category I have won each time I have been eligible (if you win you can't enter for the next 2 years, although this rule has recently been change to 1 year). My other entries were two converted Peco wagons which are running on 2mm FSA etch chassis and a pair of Chivers Finelines LMS Plate wagons also on etched chassis.

I wasn't successful with the Grand Champion prize - this went to a very fine modeller, Graeme Clancy who had built a Midland Railway signal box to a very high standard. It would have taken something special to top this and I knew I didn't have it this year - but there is always next year...

Saturday, September 18, 2010

Matherson Models Chain Links


Having read about the Mathieson Models wagons and having seen on-line their three link coupling system, I ordered a pair of wagons and some three links to give them a go.

The plan I had was to see if it was firstly possible to use to link up Farish wagons without too much hassle. The photos show the couplings fitted on a pair of Farish 3 plank BR wagons. No modifications have been made to the wagons other than having the coupling boxes removed. The Mathieson couplings have had the fixing lugs fettled by bending inwards to fit and then the whole has been glued in place. I don't think there would be a hassle in reversing the process should it be required.

I subsequently tested a rake of 4 of these (so three sets of links) on a reverse curve of Kato 348mm track and both pushing and pulling didn't cause any hassles.

Other experiments have involved closing the gap (presently 3 mm which is a bit big although narrower than the normal Farish one) and this has been with a Farish PoW wagon. The locating holes for the coupling box are used for a guide and 1.2mm holes drilled aft of each of the holes. This brings the hook closer to the buffer beam but I haven't done another to see how it goes.

The third experiment was soldering a coupling onto the re-chassied Chivers LMS Long Lows mentioned months ago - about the time Mathieson first brought out their links. A bit of fettling and they soldered happily enough onto the DG locations and again, have traversed the reverse curves in both directions. As my layout has a 15inch standard minimum, I am well pleased. Just have to work out the position to the loco now and determine the length of spaghetti which can be handled.

Further pics tomorrow.

Saturday, September 11, 2010

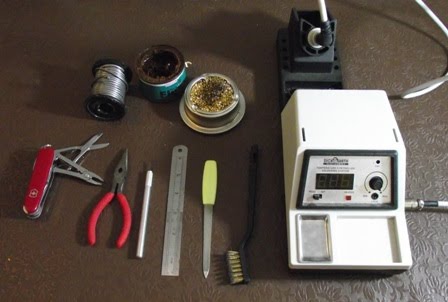
My workbench - soldering kit

Recently I was talking to one of my mates in SE Queensland who was telling me about a gathering of British Railway Modelers of Australia members (I am the Central Queensland Unit) and they had a discussion of tool kits. This got me thinking and some posts to both the 2mm VAG and N Gauge Yahoo group about kit prompted this blog.

The photo shows what I use to make the various etched kits which are shown on here. Starting with the DSE solder station and moving clockwise there is a brass brush ($2 for a pack of three brushes - one brass, one steel and one nylon at Crazy Clark's - the Australian readers will know about this mob. I don't know of the International equivalents but below Aldi on the food chain of quality gear!); a old nail file - the type with sand or industrial diamonds impregnated rather than cuts in the metal; a 6 inch steel rule; cheap knife from Crazy Clark's - I break blades too frequently to get expensive ones - this was $2 for a handle and 10 blades (currently I still have all 10 so I mustn't have used this one to open a Humbrol tinlet...); small pointed nose pliers; the must have Swiss Army Pocket Knife - in this case one with pliers and the scissor are used to cut things from etches; the roll of solder - don't know the composition as I have had it for ages and the tag is long gone; some flux paste; and a brass scourer to clean the tip of the iron.

The only bits of this kit I would describe as "flash" is the solder station (and possibly the pocket knife, but I can hear the shudders from the purists from here - wild colonial boy moi???). The rest is pretty run of the mill stuff. The nail file was nicked from my mother over a decade ago, and is starting to wear out - not bad for 10 years of various kits (mostly plastic) and now brass and nickle silver. The other bits are what I can find out here. I have thought about the more expensive kit and I believe the posts which say once you try you won't go back, but I think of the pioneers in 2mm (N or Fine Scale) who "made do" and figure, if they can, so can I. So I do.

No actual modeling has gone on this week - too much (excuse me) work. Next week won't see much happening either as I will be away for (excuse me again) work. However, I will try and be awake enough to do something next Friday - transfers probably as there are a few things which need doing before the AMMC from BRMA (Q) the following Saturday in Brisbane.

Saturday, September 4, 2010

Toad 2

So hand rails are on - the small ones worked well, the large ones, well the picture makes it look worse than it is. NVD I am happy with it. I used a jig made using the sides which I didn't use in the kit and some track pins, wrapped wire around and then soldered it, before transferring to the sides. The large didn't quite fit so was fettled. Some may have gone back to square one but I am happy with the result. Chimney ex-Minitrix Warship buffer filed down and drilled out.
Depending on the weather tomorrow, it may get painted. I am planning on entering it in this years BRMA (Q) Annual Model Making Competition.

Friday, September 3, 2010

AA1 Toad

I have been building this over a period of 3 or 4 nights so far - the chassis was pretty easy as was the superstructure of the body. The detail has been fiddly but worth it. The lamp irons (you can see the side one in this picture - it has a matched one on the other side and there are ones on each end) are spares from my J70 kit. The end ones have been twisted to look more like GWR ones than GER ones. Hand brake spare brake wheel from something or other.

Sill have to sort out the hand rails on the sides and the chimney. Then paint (GWR Grey) and transfer and await the arrival of the Materson 3 links I have ordered and connect it up to the P19 rake it will back stop.