Friday, January 30, 2015

Chivers GWR Python

I have had this model kicking around for sometime waiting, as seems to be the trend, for transfers.  Lots of kits unfortunately seem to be produced without transfers being obviously available (or if they are they only cover one period of the model’s life) and this one is no exception.   Luckily I have the Tatlow NPCS Book and it has the Python in it (handily next to the LNER Long CCT which Chivers does too – more of which anon) and the pictures give enough inspiration to get on with cutting various bits and pieces from other transfer sheets.  The only thing I wasn’t able to find was a yellow W of a suitable size.

IMG_8039

I haven’t put the sealer coat of varnish on the transfers yet and like the previous couple of Former UFOs, weathering to take place.

I have two more of these kits to build – one is going to be 580, the one specially strengthened to carry elephants but I am going to have to find a GWR Roundel transfer for that as the picture I have, dated 1947, has the vehicle in brown with a roundel!

Monday, January 26, 2015

Chivers LMS Tube Wagons

Another UFO getting close to FO status – this time with a much shorter gestation period! 

These LMS tube wagons date from 2012 when I saw some on eBay and purchased them.  They were duly made up in late 2012 and managed to get some paint on them in early 2013.  Since then, sporadic progress on transfers had LMS applied to 5 out of 8 sides, numbers applied to 3 out of 8 sides and that was it.  With 8 transfers per side (number, tare, Tube, L, M, S and a pair of small Ns to denote non-common user) I was well behind! I found them again during the tidy up period mentioned in pervious posts.

IMG_8097

Transferring recommenced Thursday night and the models were completed over the Australia Day Long Weekend.  The models were then sprayed with Humbrol Matt Varnish out of the Humbrol rattle can – not overly disappointed with the fact the black is now looking more battleship grey as it starts the weathering process.

IMG_8098

As I have mentioned before (way back in 2010!!) I have never been especially successful in getting the Chivers chassis to run well and these have proven to be no exception to the rule.  The kits came without wheels and I know the Parkside Dundas 6.2mm diameter ones are recommended but I have found a tendency with my Parkside wheels to come apart with the tire falling off the plastic centre.  Wheels therefore have been a bit of a problem for me.  I have tried a number of different manufacturers and, owing to my cack-handedness with building the chassis (previous LMS tubes in BR livery run on 2mm Scale Association etched replacement chassis – I can see already this happening with these – doubly so considering I will then be able to easily fit DGs and later 2mm wheels) there is a variety of wheels fitted, all in an effort to get them to run smoothly.  The best ones are a single pair I had which don’t match anything else in my bits box and I don’t know the manufacturer.

IMG_8099

As with other UFOs recently FOd, they haven’t been weathered.  The weather hasn’t been good for attempting to spray anything over the summer – too wet and humid – and with the desire to emulate Tim Shackleton, some practice on scrap bits is called for first I think.

Friday, January 23, 2015

Mill Lane Sidings Shock Opens

Another one of the “somethings” aka my UFOs which Amity decided needed fixing up was my three Mill Lane Sidings (now N Gauge Society kit 36 – see here for the details on the kit) shock wagons.

From what I remember from when I got them (2010 – seems to be a trend developing here…) Richard Bardsley had done the opens as part of his Mill Lane Sidings range and then sold the moulds to the NGS – I’m sure someone with the full skinny will comment and let me know if I have the wrong end of the horse.  Either way, the kits were very easy to put together and I left off back in October 2010 having painted them with Precision Paints P127 BR Bauxite as recommended.  I thought (and we know where thinking can get you) that I would have to paint the sides white to put the transfers on as I assumed (erroneously as it turns out) that the white part of the transfers were clear.

Fast forward 3 and a bit years and I managed to find the transfers and the wagons (different places – which accounts for the delay in part) and added them to the “something” pile which could be completed at the kitchen table rather than in the shed.

I painted one wagon side white and made a bit of a hash of it to be honest – spray at x paces and no masking so not flash.  Not worried as I knew I was going to have to touch up with bauxite around the edges.  Put first transfer on and that’s when I discovered the white was white and I didn’t need to have done the painting.  C’est la vie. 

So two have been done other than the tarpaulin bar – I have to find suitable brass wire – and the white stripes on the ends.  The third needs to have the paint sorted before I get it to this stage.

IMG_7965

These are similar to the P19 Ballast Wagons which I have likewise in the UFO boxes in as much as the transfers are very thick and the use of MicroSol or similar is highly recommended.  I found it very difficult to get the transfers where I wanted them and so ended up with a less than satisfying pair of models.  I am going to get a Kit 36 from the NGS to see if the transfers are any better and if so, I may see if I can get get transfers and fix them up.  As they are, wreathing will probably hide most of the sins.  I’ll put a picture up when I have managed to sort the three with bars and weathering – hopefully not a similar time span!

Friday, January 16, 2015

Bogie Luggage Van

Readers with either very long memories or recently arrived and trawling though the back catalogue may remember the title as being attached to a post made back in April of 2010.  For those now curious see here for an explanation.

As it happens, I have been back on the UFOs – the perils of tidying the shed and having your wife ask what's with all the boxes in the bottom drawer…  My UFO drawer as it happens.  So Amity counted and decided there were too many and proclaimed “something must be done about that”.  Permission was sought and granted to do “something” at the kitchen table whilst various paper craft things were being done (we can be together dear) and so “something” has been done.  I’ve finished it. 

IMG_7963

The windows were done with the Krystal Klear as suggested (correct spelling this time) and from what I could tell from photos, the only lettering was the vehicle number – at least in BR days.  In Southern days they had Luggage and Southern on them as well.  Either that, the rest was hidden under the layer of grime which seemed to be the correct livery from the 1950s as I would have assumed things like length and tonnage would have been somewhere.  I haven’t done the grime yet, but will get around to it in due course, especially as I have the weathering books by Tim Shackleton and want to try out some of his techniques. 

I remember how much fun it was to build – and I had only limited experience then.  I will most definitely be getting a couple more – one for painting in Pullman livery once Dapol bring out their WC/BB Pacific. 

Monday, January 12, 2015

South East Queensland Area Group Meeting – 10 January 2015

Time sure does fly.  3 years ago I started the combined 2mm Scale Association, N Gauge Society and British Railway Modellers of Australia Queensland N Gauge Group and I’d like to think it has been very successful in encouraging the various members of the three organisations (some wear two hats – I wear all three!) in their modelling.
 
For the start of 2015 we did something different – we went on the road for the first meeting.  This was in response to a planned renovation at your humble correspondent’s residence which, had it started when we would have liked, would have meant the place was a construction site as I type.  Alas for the plans of mice and men!  Still, David H was very obliging and offered his residence in lieu and we all had a great time. 
 
David has a US railroad taking shape in a spare room and is one of the mad men who has declaimed that he shall have a working 2mm scale layout by the 2nd Australasian Gathering – which is in August.  With 2 out of 4 points working well he is heading towards success.  The less said of the other declaimer's efforts the better at this stage!  Along with finding out we had an accidental member of the DCC club some work was done by a few of the Group towards their various projects.
 
This year’s major theme is building dioramas which fit in an archive box.  Anyone who is interested in the rules for same I’ll be happy to email them to you along with the necessary explanations for what a couple of the more localised rules mean.
 
The road show will continue until July at this stage – hopefully by then we are back to normal.  Certainly hopefully it will be all good by the Gathering dates of 21/22/23 August as it is supposed to be at the aforementioned humble correspondent's abode!

Sunday, December 21, 2014

Festive Festivities

Not much modelling going on what with the end of the School year, the start of the Christmas season and the preparations for a massive renovation (which will add two bedrooms to the house – so more of a rebuild than a renovation but for accounting purposes…).

Stuff is being done however – Thursday nights I have been going to a mates place and getting on with my UFOs in the soldering pile.  I have been working on 5 Thompson Suburbans from Etched Pixels (although I think it might be the Ultima side of the Island) and then there is next year’s Area Group Challenge which I have started. 

I hope to post some pictures in the next couple of days on the Thompson’s but in the meantime, Merry Christmas to all  - I hope Santa brings you something railway related amongst the gifts and mementos.

Monday, December 1, 2014

Swallow’s End – a first attempt at a 2mm layout

Long time readers will know I tried building a 2mm Scale layout whilst still teaching in Longreach way back in 2011.  The last entry on the topic was in October of that year when I was ripping it all up to start again on the basis that I wasn’t happy with how it was going.

So that is what I did.  I took everything off back to the paint and repainted.  There it sat, un-touched though the move home and the fit out of the shed.  I did do a bit at one point and painted the white bits brown – one of the issues I had with the first attempt was the dirt wasn’t hiding the white board underneath so I fixed that.  I then cut 3mm ply out to match the track plan as shown below:

Swallow's End Mk 2 (1)

It was like this for sometime – actually more than some time as I looked at the date for this photo is May 2012!!  I didn’t realise it was quite that long ago.  The ply is intended to allow for the ground to be below the rail level a little bit although I am thinking it will all be up there – but it does allow for the ground to rise to the track bed rather than being too high.

Anyway, I got all the bits done – the gap between the two sets of track was filled too – and there it sat for a little while longer.  Say 2 years!  Since the August Australasian Gathering, I have been determined to get “something” running for the 2015 Gathering so have put a bit of time in.  The results are these:

IMG_2016

Some foam terra forming has taken shape at the fiddle yard end (must get around to building said fiddle yard!).  Naturally this is white rendering the painting pointless!  I have since covered it with the first round of plaster – I am going to do an over layer than put brown filler over it all so that once again there isn’t white bits.

IMG_2017

Plates for structures which need to be at the height of the rail (like my Cattle Dock) have been put it.  The rail here has been glued down – only because one of the other 2mm Scale Association members in our LAG has managed to start something for the 2015 Gathering as well and he had track down so I had to!

I have also done something about the platform base in balsa wood.  It will be covered with Scalescenes sheets on manila folders (which I seem to have rather a lot of now that I have tided my desk at work). 

Further progress has taken place but I haven’t taken any decent photos – will sort that out hopefully later in the week.

Thursday, November 20, 2014

A House in Your Hand

To some of you, the title of this post will seem familiar – most likely because like me, you supported Andy Vaughan’s project on Kickstarter (here).   Now I have no connection with Andy other than being one of the supporters as I thought the idea he had was a good one and deserved to be turned into reality.

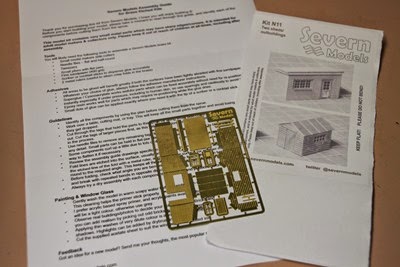
Yesterday, my collection of etches arrived.  I had put in for the Village in a Box option along with the sheds as an extra so 11 packets arrived in a parcel with some 3mm MDF packets to protect from the posties along the way.  Worked a treat – no bent items in the set.

For those playing at home, I got 1x Kit 4, 8x Kit 7 and 1x Kit 9 along with 1x Kit 11.  I had suggested the Church (aka Kit 8) but the one Andy designed didn’t really suit any of my modelling plans.  To be honest, the rural nature of most of the kits didn’t really suit either but St Alban’s Priory’s row of terrace houses is in need of refreshing, the shop I have opposite them needs replacing owing to a broken roof and the original Manor House on the layout could do with a refresh too so I was able to find places for all of the Village in a Box options which I selected – I’m going to adapt my Kit 7s into a terrace as they seem a bit small for semi-detached to me and the 8 won’t fit unless I join them up!

Since I got them and I didn’t have any work to do last night (marking season at the school where I teach is going to hit this weekend!) I got stuck in and made up the two sheds.  Andy’s instructions are for using glue but I soldered mine.  No dramas were encountered and I’ll let the photos tell the story.
Severn Models N11 (7)

The kits all came in envelops with a picture of the finished examples on the outside.  The written instructions are generic and there is an exploded diagram on the obverse to show you what to do.  The kits are very simple and well thought out so using the pictures to build them shouldn’t cause too many problems.  The written part is a list of suggested tools, comments about safety (brass edges are sharp – that sort of stuff) and so on – nothing unusual or different about them for those with experience in the medium.

Severn Models N11 (20)

After about an hours work including cleaning it all up with my Dremel, this is what you have.  The door and windows are fairly flush – just the thickness of the brass behind.  To get them positioned correctly I tack soldered them from the front then turned it over to finish them off.  I didn’t fold up the box (as shown in the diagram under the finished model) until after this step.  I made sure it was square and then put a bead down each corner to maintain the rigidity.  Fitting the roof required a third hand because of angles but once I had two corners done, the rest was easy.  Barge boards are on the ends – they are quite small and I thought here we go but 3 out of the 4 went on with no trouble – naturally the one which was temperamental was the last!

Severn Models N11 (27)

I had only meant to do the one shed last night but since it went together so well and so quickly, I did the other one as well.  The window on the second has a fold up window sill with helped with the positioning of it.

Both kits have a couple of short comings – no guttering nor down pipes and I am pretty sure the brick one at least should have a chimney.  These are going to be added.  The timber one is going to become the fodder store on Swallow’s End (long time readers will remember this is my “stalled” 2mm Finescale Plank – however… stay tuned!) and I think the wood one might end up as a gangers hut or a coal office on same.

All things being equal I’ll get some brass bits and pieces on the weekend to put the guttering and what not on and then paint.

Now to start on the rest!

Friday, November 14, 2014

Inspiring Modelling

I mentioned in my Reboot post that Julia is one of my inspirations when it comes to my modelling.  Her work on Highclere is first class and I would love to get to see it in real life one day.  Got to save the airfare first I guess!
 
One of the other inspirations to my modelling is much closer to home.  He is one of the members of the N Gauge Gang who come to my place once a month to “get stuff done (although sometimes the stuff is talking!)”.  Ken and I have known each other for getting on 15 years and his modelling has been pretty eclectic during that time, as he got frustrated with British N, moved to US N, then changed scales completely and spent sometime doing 7mm QR Cane Trains.  He is now back in N and as a result has joined out little group.
 
His most recent project has been to create a small shunting layout based on a dock scene.  He has used a number of kits from the Scale Scenes range along with a few Metcalf buildings and done a great job. 
 
At the October meeting he brought it along – 900 x 300 I think is the all up measurement.  Unfortunately he didn’t bring the power pack so we could only look, rather than play.  Given that he is presently putting a pile of stock together with DGs the full on playing won’t be far away. 
 
A few photos to inspire you.  The 04 is in the Etched Pixels tramkit as the FQR shunter “Mavis”.
IMG_1977
IMG_1976
IMG_1975
IMG_1974
There is a boat in the offing to be docked – not sure if cranes are going to make an appearance or if the ship’s derrick will do.

Incidentally, the 200th post on my blog!

Tuesday, November 11, 2014

A Quick Catch Up.

As I mentioned in the previous post, I have tended to spend my modelling time actually modelling (assuming I have had the mojo for it – this has not always been the case!) rather than blogging about modelling.  Consequently there have been a number of things which have been mentioned on this blog but haven’t had the whole story shared. 

So what has been done?  Well I have had a look back over the posts of this year and noticed what I had mentioned and so the following list has been compiled:

  • The makeover on St Alban’s Priory has been largely completed.  Still some stuff to do but having survived TMTEX as mentioned in the June post, I haven’t done anything else with it.  There are some photos to put up on it so I will get onto that later in the week and hopefully have the current state of play for viewing early next week.
  • The LNWR D6 on Shapeways as mentioned in the June update has been fairly successful.  I found from my test print that the buffers were slightly in the wrong spot so I did a second rendering.  I haven’t had the second go printed yet – but someone has!  I haven’t heard any bad things about it so hopefully they were happy.  I will likewise put a more detailed post up about this too.
  • 2mm Scale Association members will have read about our very successful 1st Australasian Gathering in Sydney in a recent Magazine.  We are having another one next year over the same weekend – third weekend in August – in Brisbane.  The Gathering was a very inspirational event and as a result of deciding to have it up here next year, two of us have bravely (rashly?) decided to have layouts!  So Swallow’s End has been dusted off and progress restarted.  More to come – particularly on the tar wagon.
  • I have also been dabbling in Victorian Railways N Scale building a pair of Spirit Design Y class shunters.  There is a T in the offing but these (a pair again) are being built by a mate who is going to end up with one of the Ys.  Whilst this hasn’t been mentioned, there will be some story – although not quite as many photos as I had hoped! – to share.
  • Lastly the local Area Group has been having its regular meetings and some of the modelling being done has been very inspiring in its own right.  We have decided to have a challenge next year – build a diorama in an archive box!  More on that to come too.

So not all doom and gloom and lack of progress – just a lack of sharing and recording.