Wednesday, December 28, 2011

Christmas Loot


You know you have done well with training (pun intended!) your family when this is what you get from your wonderful wife and 4 daughters for Christmas.  Amity gave me the books (having sorted the ordering herself.  I guess it helped having the shelf of all the other Books Of next to the computer!) and the girls gave me a wagon each - increasing my train of colourful and cheerful wagons to 32.

In other news - not much modelling - but progress is being made on the area where it is hoped that a meeting of 2mm SA members, NGS members and BRMA members (some who wear multiple badges but I think I am the only one needing three heads!) with a view to forming a joint Area Group will be held in February next year - if you are interested in joining, please email me for details.  Hopefully enough work will get done tomorrow to justify a photo and with even more luck, my layout maybe back soon.

Wednesday, December 14, 2011

Taking Stock - the coaches


With the weather and time conspiring against me in getting progress made on my shed (there is still too many things in it which should be in another place but it has been raining which makes moving things around outdoors a little tricky) I have not been able to do too much train wise since moving back home from Longreach. 

One thing I have done is collect most of my rolling stock and locomotives from storage at my parents place and one evening this week I took over the dining room table to sort out the coaches.  I am trying to work out how best to store them - rakes obviously, but by Era or Region or a combination of both.  They may yet be stored in a yet to be determined system based on layout requirements.  The first step I felt, after 4 years of buying but not seeing, was to see.  As it happens, the photo above isn't all.  One of the new Mk 1s (a CK for those keeping score!) is missing from the Blue/Grey set as are the 7 Mk 3s I have waiting to become the Royal Train.  Also missing are 20 odd Minitrix Mk 1s (which are most likely to be turned into Thomas the Tank Engine coaches and used by the kids as they have no boxes, some need some attention to reattaching bogies and all have been painted by moi when I was much younger!)  So Farish suburbans (LMS type) are also missing as are a few odds and ends around the place not to mention most of my parcels stock.  To say Amity was surprised would be an understatement!

Next up will be to sort out my wagons...  I may need a bigger table (this one is 8ft x 4 ft and seats 10).

Monday, December 12, 2011

Close Coupling

Owing to the big move (successfully completed but now unpacking!) not much has been happening on the modelling front.  Last night was one of the first forays back into it, but with my train shed out of action (still packed boxes are in it along with other "stuff") it was limited to what I could do on the dinning room table.

This consisted of working though my collection of 101s (RR, SYWP Green and BR Blue 3 car), my collection of Blue Ribband Mk 1s and my Class 411 and sorting out close couplings.  I set up a reverse curve using some Kato 315mm radius curves and set to work. 

The results are quite pleasing.  One short and one long Farish NEM Rapido in each Mk 1 and these go round happily both pushing and pulling coupled long to short.  For the MUs of all persuasions, I have used the Dapol knuckles.  For all 4 sets a pair of shorts worked fine.

For those wondering what my train shed looks like - picture below.  7.5m by 6m and no, I don't have t share with the car!  I do have to share with my own workshop but that is ok as it is MINE, ALL MINE  (Bahahahahahhaha!)  (Tinks (in best Bluebottle voice) "maybe I have been in the outback too long" Untinks)


Tuesday, November 29, 2011

The Last Post

This is probably the last post from Longreach as we are leaving on Saturday for home - and the train shed!  4 years in the bush minus my main layout has been at times quite depressing particularly as I would (like I did today) get some nice models and not have anywhere nice to run them (the RR and SYWP 101s arrived today).  I won't have my layout probably until the New Year but it will be much closer (at 30 mins instead of 12 hours drive!) than it has been in a while, and with my full set of tools and my shed, I can make a proper start on some of the plans I have, together with faster progress on some of the things which I have started whilst out here.

The last bit of modelling was done today - I got some black on the K class.  Tonight I have spent some time sorting out and packing away my work bench.

Photo of the K below - looks pretty good.  Once I get the steps on, I will do some detail painting before looking at the transfers - then there is the tender bogies and I will be done.

Sunday, November 27, 2011

Victorian Railways K Class Part II

Progress has been made on K190 with some of the brass detailing bits having been done.  As you can see in the head on shot, the body isn't on square (and the handrail above the smoke box door needs fixing) but it does sit square - just not fitted correctly for the photo.  I still need to do a bit of cleaning up around the cab windows and add in things like the steps and so forth before painting in black.  I tried to organise it so the light would work on this one too (see the 3801 updates below) but almost drilled a hole in the middle of the smoke box so decided to abandon the project where it is.  I will paint the inside of the light silver prior to glazing.

The tender has had no work done as yet - I have to sort out the lack of bogies for it so inspiration has been hard to come by.


Wednesday, November 23, 2011

Victorian Railways K Class

Along with the Badger Bits C38 kit mentioned previously (now waiting for me to get to Brisbane and Horizon Hobbies to purchase the paint recommended by the Australian N Scale e-Group) I purchased the VR K Class kit as I had been on a trip from Lilydale to Yarra Glen with K 190 around the same time as 3801.

Like the 38, it is a resin casting to fit on a Micro Ace chassis.  Unlike the 38, no mods are necessary to the chassis and the loco body was easy to clean up.  Progress pic below, followed by one of the real thing I found on the Internet (Michael Greenhill's photo from Flicker.)  I plan on making mine look like this, minus the sticker under the cab window so it is an ideal shot for inspiration for the model.  I have thoughts on the motor in the cab but haven't explored options for making it smaller yet.  Next step with the body is to drill out the chimney and then put on the brass etch detailing bits.


Sunday, November 13, 2011

More 38 progress

I have almost got to the point with my 38 that all which will be left will be spraying it green, the detail painting the cab roof, cylinders, front end and light before putting the transfers on and the glazing in before coaling the tender.  This means I have managed to fit the front buffers and steps, fit the cab steps, put on the rear buffers and fit the tender ladder and put on the hand rails - I have, at the time of writing, only put on the RH side one.  LH side hopefully later today.  I have also managed to fit the body to the chassis square - my initial efforts had it a little RH down but a bit of clearing of the inside of the has solved this.


The twist in the ladder has been fix - I guess that is one of the uses of close up digital photography!
You can see the slant in this pic taken with the motor removed but the light on.  Quite pleased with the effect although I will be dimming the light once I DCC the loco.

Saturday, November 5, 2011

38 progress

Having put in about an hour of work on the cleaning up of the cast for the body (which needed a bit, but only on the underside of the footplate and around the front steps - the boiler was very clean with no need to file or fill). 

The Micro Ace chassis which is supplied for this has a light in it so I have painted the whole black (including the tender so there should be no problems when I come to paint it all green - at least the green will have the same undercoat) to stop the light shining where I don't want it.  I due course (tonight possibly) I will drill out the front light and after painting fill it with some Micro Glaze or something similar.

Don't worry if you are looking at it and thinking the body is high at the cab end - it is.  It does go on straight but this was a quick photo session to show progress to a couple of people and to update the blog.

My parents sent me the photo below - I am the one of the left looking at the photo with my brother.  This was 3801's first trip on the Main South to Moss Vale following its return to steam in 1986.  We had travelled up from Melbourne on the Inter Capital Daylight (instead of chasing it in a car as we normally did) and then following the return from Moss Vale caught the Melbourne Express (the replacement to the celebrated and much missed "Southern Aurora" sleeping car express) overnight back to Melbourne.  I am planning on making my model look like this - possibly without the two little boys in the foreground however!

Thursday, November 3, 2011

NSWGR C38

A few years back I met Phil Badger of Badger Bits and Ixion fame - prior to the initial Manor release actually - at the AMRA Exhibition in Brisbane.  Phil had emailed me prior to the show to say he was coming to Brisbane for it and would love the opportunity to catch up.  His intended 30 mins ended up being 3 days and at least one evening into the small hours as he learnt a lot about British steam locos from myself and Ben of Oz (check out Ben's stuff on RM Web by searching for nebnoswal - he is doing a great job of building Sturminister Newton on the SDJR in his shed in Victoria).

Phil brought with him this:

Now for those who don't know a lot about Australian Steam the NSW Government Railway C38 hold pride of place - mostly because the class leader, 3801, travelled across the continent in 1970 and again in 1988 prior to Flying Scotsman doing the same in 1989.  (Had the Victorian Railways not scrapped their S Class 4-6-2 Streamliners, then the C38 may not have had top spot.)  Suffice to say, 3801 is the Australian equivalent of 4472.  The model photographed on my "St Alban's Priory" layout is of 3802, the next in the class.  5 were finished like this, and 25 without the bullet nose and cowling on the top of the boiler.  Similar to the LMS Duchesses the streamlining didn't make much difference to the capabilities of the class.

I have been eyeing off getting one of my own pretty much ever since and in today's post I got both the Badger Bits kit for the C38 - with 3801 transfers - and a kit for a Victorian Railways K class 2-8-0.

So far work has progressed on cleaning up some of the flash on the body - resin cast and it goes on a Micro Ace chassis.  Can't really tell you much about it as Phil forgot to put the instructions in and I haven't yet emailed to ask for them!

Photo to date:


All things considered it is a pretty clean casting.  Further progress photos and postings in due course.

Sunday, October 30, 2011

Something a bit different

Introducing the EMD FP7-DC Demonstrator. 

I was inspired earlier this year by Nick Dibben's "Willow Bridge" in NGS-J 2/11 to dig out some of my US stuff and have a play - which in turn had the Darling Daughters get out their assorted collection of stuff, practically all of which has been purchased because they liked it and is generally of US outline and from the bargain bin at hobby shops (no sense spending a lot on something which has a better than average chance of heading to the floor at the hands of a 2 year old, although it has to be said they are all very good with the trains - mine and theirs).  Amongst the stuff we were playing with were some Bachmann FP7s which I had purchased with the intention of using them and the TPM MU motorising kits to make some EMUs for "Swallow Street".  With that layout being in store pending a rebuild in 2012, the making of the EMUs took a back seat and now that Farish has announced their entry into RTR EMUs (with the hope that they may shrink the 2EPB and MLV from OO down) there isn't much incentive to do anything with the pair of A units nor the one B unit I have left. 

As a result I had a thought and the photo above is the result.  The main idea is from the Victorian Railways B Class - see here - but the B is a Co-Co and a bit longer than this.  So I have dubbed it the FP7-DC Demo.  The FP7 was a passenger rated version of the F7 with an extra 4 feet for the water supply for the steam heat boiler.  As this is a Double Cab version, it made sense to call it the DC.  As there were never any in service the Demo was pretty obvious. 

I have done some filling of holes prior to putting new ones in.  The two donor bodies were PRR and NYC and these had different number boards so this has had to be fixed.  A bit of milling and removal of metal from the chassis was required to fit the second cab on but this was fairly straight forward.  Drive chain wise, nothing was needed to be done. 

I have a bit more filling to do prior to working out a paint scheme - maybe EMD like this loco.  Then there is the refitting of the couplings and putting it to work on the kids layout - probably as Dad's Engine so there isn't too many fights over it!

Wednesday, October 26, 2011

Chivers LNER CCT

I had a win on eBay a few weeks back, picking up 3 LNER CCTs from the Chivers stable already built from the USA for the right price (compared to a new kit - and that included very quick by US Mail standards, postage).  I have been hoping to get a few more of these to go with the one example I have from when Chivers was still producing the whole range of their N Gauge kits (unlike the current situation where they seem to drip feed one shop in Preston, UK - I obtained 2 GWR Pythons from their eBay store following a tip off on the 2mm VAG a month or so ago).

When these landed the first thing I noticed was the paint job looked better in the pictures!  Not a problem, as I was thinking of BR era (57 were built in 1950) rather than LNER so into the stripper they went.  The clean up was pretty easy and then I had a closer look at the build.

A few issues need to be resolved.  The Chivers kits are probably the best for minimum flash going around and these are no exception.  There was the odd bit in the window apertures so I sorted that out and a bit on the roofs.  Closer inspection of the roofs showed that while the vents had been fitted, only 4 out of 24 were aligned correctly so I have chopped them all off and will replace them with spares that I have - although I am leaning towards putting Ultima torpedo vents on instead because they are bigger and while possibly not to scale, they look "right" compared to the Chivers option.

On reflection the paint jobs will be three - one is going to get LNER teak to join the collection of LNER vans I have - and I will put 2mm replacement W irons on so I can put it on the 2mm track easily.  One is also going to be painted BR Blue - although possibly not as weathered as the photos on Paul Bartlett's wagon site (link to the right).  The third I am not sure about.  I have one in Crimson so it may be painted maroon to give me the fourth option.  Time will tell.

Sunday, October 23, 2011

Dapol Class 26 Review

Having read good things about this (and having seen some pictures of the blue one attached to some of the new Mk 1s from Farish) I decided to get one on a whim as it doesn't fit my modelling interests - they were mostly based in Scotland I believe.

My example arrived last Friday (21st) and ran beautifully from the box.  No dramas at all.  The only complaint I had (and this is almost universal with my new era diesels) is the red is on all the time and cannot be switched off - OK when running light engine but not too flash when hauling a train.  The other minor grumble I have is the blue seems to be a bit too green when compared with other Blue Era models I have (and not just the Farish ones - seems Dapol have changed the paint spec).

I went to put a TCS EUN651 chip in it and that was when the trouble started.  The instructions don't warn you the lights are attached to the chassis.  I found out that they are plugged in from a post here on the N Gauge Forum.  Initial efforts to put the chip in proved to be far from easy.  To start with the body wouldn't sit down correctly so after a few attempts I removed the chip and put the blanking plug back - the blanking plug is noticeably shorter than the chip I chose so I wondered if the chip wasn't the best choice.  No dramas really I figured I would email Dapol and ask.

As it happened, the wires leading from the plug leading to the LED cluster managed to work loose.  The infamous Dapol dry solder joints seem to have finally struck me.  Mind you, I don't have a lot of Dapol locos as I have been made gun shy of them by the horror stories of the Mk 1 versions - although the diesels tend not to have these in the same abundance as the steam locos.  Now sending it back is usually the cry in case like this - and fair enough too.  The loco had merely been run for an hour and now one set of LEDs wouldn't light up merely by the owner attempting to DCC the loco.  No tools near it.

Since I was emailing Dapol about the chip I added the information about the light.  Joel @ Dapol replied quite quickly asking, not unreasonably I thought, for photos.  So I sent them off.  Nothing heard from them since so a bit disappointed considering there was a few hours left in the business day over there when I emailed the second time - POETS perhaps?

Fortunately I have been able to fix the LED cluster (seems the soldering of 2mm kits has paid off in other ways!) and by removing some padding and replacing it will some tape (since I assume the padding is part of the insulation protection for the plug) I have fitted the chip of choice and the loco is now happily trundling around DCC and ready to go.  Still have the red LED issue to sort.

I have discovered one other niggle - the coupling pocket.  It would be handy if Dapol included a bogie surround which was minus the pocket - or even a spare which the owner could cut the pocket off.  The pipes and bits which are included in the bag can only be fitted as far as I can tell with the coupling pocket removed.  Now this would render the locomotive as a one direction loco.  Not a problem for a DVT or a steam engine (such as the forthcoming A3 or A4) but on a 26 it is a bit of a pain.  More because if you change your mind and remove the pipes to sell the loco in the future you can't replace the coupling.  So I am not sure - I haven't worked out a train for this loco yet but it may end up hauling some Mk 1 coaches with Sc numbers whereupon I may remove the coupling and put the pipes in.  In the meantime, a short shank coupling is going in and we will see what happens.

Thursday, October 20, 2011

Sealion II


I have not been doing much modelling of late - work mostly getting in the road and an impending 1200km move in early December having had me pack quite a bit of stuff in preparation being the chief reasons.

I have managed to get the odd things done around the place and one of the more recent sessions resulted in the Sealion previously shown in brass having been painted and the bogies fitted.  I have had a chance to compare it with the Farish offering and the two are significantly different - and not just because mine is black!  The main fault I have with this one (other than the doubtful build of the chutes but too late really and it is hard to see standing still, much less underway) is the coupling distances.  I will have to do something about that, but at this point in time, it goes around my test track (which required the bogies to have brass washers put between them to give a little more height for the flanges) and, once loaded and weathered, should look pretty good with the allocated 33 that it is getting.  I just have to get one of the new transfer packs from the NGS to finish it off.  And maybe a couple more kits so it isn't lonely!

Friday, October 14, 2011

DCC

I have been having a play with my DCC gear again having received a number of chips from Bromsgrove Models and Hatton's.  So far, I haven't seen much difference between the TCS 6 pin and the Bachmann 6 pin in the Class 24 I have been having a fiddle with.  Now the general consensus from a number of points of advice all said the Bachmann chip was useful for putting in the trailing car of DMUs (which is partly why I got a few from Hatton's - I have two 108s and a 150/1 and 150/2 at present with 3 101s on order (including a 3 car set) along with the 411 EMU) but given that it is the Bachmann chip and the literature says it is tuned for the Graham Farish range I thought I would give it a go.

The only real difference I have been able to see is in the options for lighting - although I can't seem to get the random firebox flicker to work on the TCS chip to make it look like I have oil lights burning instead of the lights behind the discs.  Maybe it is all too subtle.  In any case, having put the conversion TCS drop in board into my Atlas GP-9, I am very pleased to be able to select a variety of lighting options so my cunning plan at present is to put Bachmann chips into Bachmann locos (and given the price is almost 2 to 1 against the TCS) where possible, and put TCS chips where it isn't (so I will be getting some Z2 chips in due course for my 04s and 08).

Now I don't have a big layout for fooling around with DCC - in fact it is merely a length of Kato Unitrack to test and program on - but it is nice to have all the locos sitting there with their lights on (assuming they have them - the Class 45 conversion doesn't) and being able to move the one in the middle without needing a lot of switches!

Monday, October 10, 2011

Reviewing progress

I did some more work on Swallow's End tonight and in the end, decided a number of issues were going to bug me if I kept going.

The first of these - and arguably the most significant - is the fact that doing the "dirt" has resulted in me having to double layer it.  This, I suspect, is partly because I didn't paint the board under the "dirt" brown first and therefore the white showed through the Woodland Scenics scatter too much.  While putting a second layer of dirt on isn't that much of a hassle, it resulted in the dirt being higher than the ballast.  Now previously I have done the dirt first and the ballast last, and I have been using Peco track so the depth of the ballast is significant, compared with the surrounding country side.  This time I did ballast first and dirt second and using PCB sleepers, the depth of the ballast isn't deep enough compared with the double shot dirt.

The second thing which has been irking me, is working in small sections.  Previously I have tended to paint a wide area (mind you in the past the narrowest layout I have had has been 800mm heading upwards to 1000mm and lengths have been in the 2500mm heading to 4100mm so lots of dirt required!) with glue, sprinkling away then flood with more glue and walk away until 48 hours had passed.  Now the 48 hours still holds true but the smaller patches are showing up with boundary marks.  While I know there are boundaries for fences and whatnot there are too many patches with this landscape for my liking.  I have tried hiding them using various methods but I haven't been satisfied with the results.

Consequently I have decided the whole lot has to come up and I will restart.  Because the track has been glued down with PVA or taped down with DS Tape, all this is going to come up as well.  As it happens, the only bit which I will lose is the the concrete slab for one of the coal merchants - I don't think the paper will survive the bath which is coming up!

On one hand it is a bit frustrating that the hours I have spent ballasting and what not around the places which I could do it have come to naught but on the other hand, given that this is a whole new standard of track and rolling stock to what I have done in the past, I feel that I should strive to make all of it better than normal.  My first efforts fell short - and it has cost me time, a packet of scatter material (well most of a packet - there is still some left over) and some glue.  Cheep as learning experiences go.

So tomorrow is shaping up as bath night for Swallow's End.  Then I will see about putting the track down on cork or something similar to get a bit of height on the surrounding country side - not much, 2mm at the most so I get a nice looking track bed - and I will paint the dirt areas brown before I put anything down this time.

And to think I looked at Missy's Highclere and was a bit smug that I hadn't ripped mine up.  He (or she) who laughs last... or pride goeth before the fall.

Wednesday, October 5, 2011

Return to Swallow's End

After a hiatus of many weeks (months actually) I decided it was about time I did something more on my embryonic 2mm layout.

At last visit, I had made a start on the dirt, and had put down all the track bar the points, having also ballasted the track which was put down.  I am still not convinced, having put soil around the place, that ballasting first, rather than my usual last, is a good idea.  There is more cleaning up to do on the edges than I usually have to do - my logic for ballast last is that is what happens in the real world although, to be fair, in the real world the track comes after the landscape!

I hadn't put the points down because I hadn't sorted out how I am going to change them - the TOU.  I still haven't although I have a couple of ideas which is why I thought I should do something.  The first something I had to do, was make sure all the points were "gapped" correctly.  This involves making sure the frog is electrically separate from the side running rails - which are also having to be separate from each other.

Being a little concerned about the issue of short circuits, I thought about if for a while and decided the simplest thing would be to wire a light bulb into a circuit with the points.  The photo below probably explains it better than I can with words:


Simply power from a 12v source to the light, then to the RH rail.  The other rail connected to the other terminal on the power source.  If the light is on, then the point isn't gapped.  Find all the bits I missed (which turns out to be more than I thought or hoped) and clean up the various over solders and missing gaps - usually where I hadn't cut all the copper away cleanly - until the light goes out.  Move one wire to the frog and see if it goes on with a feed to either outside rail.  If not, then success.

Tonight I have, in between watching TV, checked two of the 6.  At this rate, I will have them all done by the weekend, at which point I will trial fit them on the layout and make sure the frog rails aren't touching anything they shouldn't.  Then the TOU saga begins in earnest!  

Thursday, September 29, 2011

LNWR Horse Box - Paint update


Sorry about the poor photo - you should have seen the others! - but it shows where I am at with this kit.  The roof is bowed - I seem to have managed to muck it up after fitting and it has flattened out where the square vents are.  It is more noticeable in the photo than normal but given how long it has been gestating and how much my skill level has improved since then, I figure it will serve.

Paint is the Precision version of LNWR Plum.  Sources vary as to what colour this vehicle should be so I have pleased my self with this.  The couple of photos I took with a flash actually showed it is quite thin in parts so I suspect it may need redoing with an airbrush in due course.  There is still the matter of lining and so forth but this will have to wait for another day.  Once all is complete, I will add the brake cylinder which will be a left over one from an NGS kit.

Comments, as always, are welcome either on the blog (which is a hassle I know) or via email.

Monday, September 26, 2011

Organising

One of the advantages of coming to Brisbane is it has given me the opportunity to organise most of my collection and make some plans for the next couple of months.

I brought down the majority of the stuff I had in Longreach - some which is now, a few days later, heading back - so I could put it all together and get some sense of where I was at with providing for the various interests I have.  As it turns out, I needed both more time and more room to do this!

The first thing I learnt is, I don't have enough stock boxes to make a coherent plan.  My ideal situation is to have things organised by region and era - particularly with coaching stock as this has a greater impact on setting the scene than goods stock does - but I found I was about 4 storage trays short of doing this effectively.  On one hand, this is annoying as it means I will have to get the materials and make some more, but on the other hand it is useful to know before the big move so I can budget for this stuff in advance.

The second thing I learnt is trying to organise goods vehicles is a bit of a mugs game.  In the end I am putting them in three categories - fitted, unfitted and shunting.  The last is those wagons which are fitted for hands off shunting.  My present system is to use the Peco couplings, the lifting arms and electromagnets, but having tried DGs I am a bit of a convert so I can see a mass re-fitting program taking shape which will probably see all the Peco wagons progressively be replaced with Farish ones.  This has its benefits as the Farish ones are better looking and more accurate.  The down side is replacing 60 wagons!  There will be a time when both are being used I am sure.

Lastly I was able to gather up all my BR Blue era locos (along with the 04 Trams) with a view to fitting them all with chips for DCC operation.  There are quite a few to do - some, like the 37, are plug and play.  Others, like the Poole Farish and most of my 73s are not so this will be an adventure.  First thing is to work out which chips to use.  So research coming up.

Friday, September 23, 2011

AMMC - 2011

The 8th Annual British Railway Modellers of Australia (Queensland) Modelling Competition took place on Thursday 22nd of September this year and I made the 1200km journey (with wife and kids) the day before - partly to enter and partly to return the 3 trophies I won in 2010.  I was in-eligible for these 3 categories this year and, while I was keen to enter the remaining 4, in the end I was only able to get organised for 2 - the Diorama and the Scratch Built Line Side Structure.

As you can see from the photo, my cattle dock was judged the winner in the Line Side Structure and the diorama which I made for the N Gauge Forum was successful in the Diorama section.  Both of these categories were well represented this year after both failing to have enough entries last year. 

I was unsuccessful in the main prize - the Martin Astle Memorial Trophy for Best Model which was awarded to a 7mm model of 4472 in A1 condition.  There is, however, next year!

Friday, September 16, 2011

GER Mac K - Part I

My efforts for this evening.  Not the traction engine - it has been on blogs before.  No, the Masterclass Models GE/LNER Mac K on which it is sat.  Unfortunately, I don't have any buffers or these would have been included.  As you can see, one of the DG's is fitted - the latch end.  I haven't put the bar end on yet.

I purchased this kit from Shop 2 simply because it is a GE kit.  When I got it, I had a look at the etch and thought gloat box for a bit.  Tonight however I got it out because my original plan for the evening, building a chassis to go under an NGS MR van kit, wasn't going to happen because I have a 9' chassis and I need a 10' Peco replacement.  So I had an evening with modelling mojo present and nothing to do...

A bit of a rummage round presented either the above or the pair of LNER Toad E's I have, also for the W&U collection.  I have a quick look at the destructions for the Mac K and decided it wasn't all that bad and so sallied forth.  The picture above is the accumulation of 2 hours solid work - only one cup of tea was harmed in the making of the model.

The destructions suggest fitting DGs is interesting.  Certainly you can see how I have bent it upwards but it couples and uncouples from the test wagon so it can stay that way.  I folded up the mounting plate behind the buffer beam and then filed a bit off the buffer beam down to the mounting plate before putting the DG on, having cut the mounting bit on the DG quite thin. 

The traction engine is the Fleetline/Skytrek one, minus the roof (Trevor the Traction Engine doesn't have a roof - he also maybe a different model but Rule 1 and all that!).

Monday, September 12, 2011

All quite - well kind of

Work has gotten in the way of hobbies of late - it being the time of the year that my Yr 12 stuff has to be sorted out and sent away for verification.  Coupled with kids who aren't sleeping well, there isn't a lot of modelling mojo going around.

In an effort to try and do something, I tidied my work bench (Amity suggested I should take a before and after picture and blog that but I don't think there is much difference between the two - it is more organised chaos rather than merely chaos when it is tidy!) and did some pottering.  Nothing worth photographing but this is what has happened:

DGs have started to be fitted to the Fruit Van train which is destined to be hauled by either a BR J70 or a Cl 04 when Elm Road is finally built, early next year.

The treads on the Cartic 4 are half done.  Not a fan of stainless steel, no matter how much nicer it might look compared with n/s.  I think the n/s would have been better as it would have been soldered into place rather than glued - and with less bubbles.  Definately need cars for this first one!

A perliminary coat of paint has been applied to the LNWR Horsebox.

So not much for the best part of a week.  I must really get stuck in and get a couple of things finished prior to next week - we are going to Brisbane for the BRMA(Q) AMMC.  Hopefully I can manage to snare a couple of prizes - Scratch built lineside structure (the Cattle Dock) and Diorama (the Cattle Dock again - but this time with art around it as previously shown!).

Sunday, September 4, 2011

LNWR Horse Box - Update

Way back in August 2010 I blogged about building the PC Models shoot down of the D436 LNWR Horsebox as sold by Ultima.  Some of you may have found this blog because Alan linked to it from the relevant page in the catalogue.

Well, progress didn't get beyond what I showed back then, because I was trying to figure out a roof (and what the roof should look like) and the detail on the chassis.  I was also wondering how to fix the errors I had made in folding the chassis as it didn't run square.

Having learnt a lot in the last 12 months, the box with the model in it, made it back to the top of the UFO pile and, given that I have been on a bit of a Pre-Grouping build kick recently, I took another look.  I had managed to pick up David Jenkinson's LNWR Carriages (Pendragon) which had a picture of 'box number 337 in it and a diagram number so Google was more useful with this information, showing me a couple of other kits from different manufactures in different scales.  As the roofs on all of these were the same they were either a) correct or b) working off the same incorrect drawings.  I figured since it is almost 90 years since the LNWR became part of the LMS and over 60 years since these were running in LMS livery, I feel that the chances of anyone "knowing" it is wrong assuming b) above are slim so I went for it.

As it happens, having seen the pictures of the completed models, I learnt the vents were square.  I was wondering how I was going to model these (having assumed the etch supplied only flat bits and the vents would be castings - not supplied) I had another look at the etch and found they were fold ups needing me to only find a scrap bit of etch to put a lid on.

Further fettling of the chassis resulted in it getting worse, not better.  I was still no closer to working out how to do the axle boxes and springs but discovered I could get these via Ultima - I don't think Alan had them 14 months ago when I ordered the kit.  I decided in the end to cut my loses and used a 2mm SA etched bogie, cut in half and fiddled around to the point where the thing runs square rather than crabbing - it isn't spot on when you look at photos but given that it wasn't going to look spot on anyway, I think practicality trumps look in this case.

So an updated photo of the first one - armed with my learning on this, I am going to organise a second which, hopefully, I will do a much better job on.    I have yet to work out a paint job - LNWR plum, "quick brown" or LMS crimson.


Sunday, August 28, 2011

Painted GER Wagons

I have had a go at painting the Prize Cattle Van and the Fruit Van but I am not too pleased with the results.  The biggest hassles are getting good coverage of the white - on the Fruit van there has been a bit too much of a build up around the vents for example - and the painting around the louvers on both.  Part of the problem is I am limited to a brush so the coats are thin and take time but probably aren't thin enough.  I think I will strip both when I get back to Brisbane at the end of the year and redo with an air brush - at least that way I can prime in grey, paint white then mask and paint LNER Teak.  I am working on the basis that they are 1920s version and by this stage, rather than varnish (as was done in early GER days) the works painted.

The second of the Fruits is at the stage of needing buffers and the underfloor stuff done (the pair above need some detailing bits done under the floor too but as these will be in plastic and then painted black, it isn't critical at the moment!) but I will have to organise with Shop 2 some buffers before anything else happens there.

Saturday, August 20, 2011

More GER Wagons

Having gotten inspired following the progress on my GER Cattle Wagon from the 2mmSA and the drawing closer of train 2 for the proposed Elm Road layout (base board building is slated for January BTW) I decided to hook in and get started on train 3.  Those familiar with W&U books will be also familiar with "The Sweeper Train" as Amity and I have dubbed it.  Basically it is a picture of a mixed train of two GER Sundry Vans, a GER Prize Cattle Van, something which looks like a GWR Python (but probably isn't!) Brake 16, a bogie tramcar and a 4 wheel tramcar, all hauled by G15 (Y6) No. 0125.

Long suffering readers will remember back in March or so last year (2010 - helps to put this in for readers in 2012...) we got some etches (some?  Heaps!) from David Eveleigh to put together the stock of the W&U.  These etches included most of this train.  The 4th vehicle is the only one missing (the one which looks like the GWR Python to this untrained eye).  So I have been doing stuff towards this.

First up is the GER Prized Cattle Wagon.  As it happens one is still in existence and is in store at the North Norfolk Railway.  A picture of one way back when is here.  Pity it is in B&W because I have spent some time this afternoon trying to work out if these wagons were painted a la Passenger Stock (ie Teak) or having being converted to fruit conveyance (hence its appearance in The Sweeper Train in 1921) to GER Slate Grey (and therefore the colour the GER Cattle Wagon in the previous post).  I am pretty sure they didn't make it into Crimson, which is what coaching stock was painted in from 1919.

David's etch for this is merely the body.  Chassis and Roof along with other bits and pieces as required the problem of the builder.  This one is running on the same chassis as the Cattle Wagon but with both sides braked.  The roof is a spare one I had around, still have to remove the last vestiges of the rain strips as the roof was for something longer!


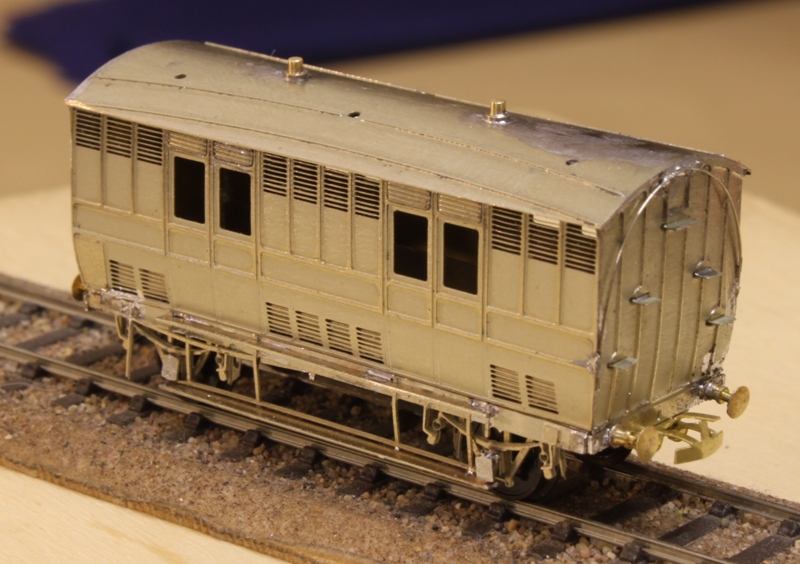
Second up we have one of the two Sundry Vans which appear at the front of the train in question. This time all the required bits other than wheels, bearings, coupling and the hand rail seen over the steps are included. Again, my research hasn't convinced me of the livery for this wagon, but it was still classified NPCCS in 1921 so I suspect it was teak.  The photo which I am working off, does have the tramcars in a much darker shade of grey - and the bogie one has a white roof suggesting recent shopping and thus painting.  This would make the tramcars in the Lake livery which No 7 is currently in at the NNR and the rest of the train in...

Amity suggested I should paint the two wagons in what I think is the correct livery, post the pictures and sit back and await developments.

The Prize Cattle wagon was at a running stage prior to the weekend, merely requiring the roof to be added along with the DG.  The Sundry Van was started yesterday evening so is the work, on and off, of just on 24 hours.  I am aiming to have the second one completed prior to going back to work on Monday.

Thursday, August 18, 2011

GER Cattle Wagon revisited

I found some buffers when I was tidying up my workbench so I have pressed on (despite fighting whatever dreaded lurgy there is travelling around Longreach at present) and fitted these and painted the wagon.  Still have to do transfers and then weather.

Last post I said I would try and take some pics of the interior.  Members of the VAG will have seen the results of these - they served their purpose but weren't especially good shots of the model.  This photo shows the interior in what I think is more likely circumstances - still shows up, but not worth the hassle I think to do much with.

Hopefully I will have a productive weekend - as this wagon is for the W&U collection and progress is being made on the DG couplings on the Fruit Vans, I am hopeful of starting on train 3 over the weekend. 

Tuesday, August 9, 2011

GER Cattle Wagon


Above is my build of the 2mm SA GER Cattle wagon kit running on the recommended chassis.  I don't have any buffers (NYA or TOS seems to be the issue there) so it isn't ready for painting yet.  I have managed to work out a system for DG couplings and these are fitted and work on the test bench so very please with self for that.

The original build didn't use the wire you can see in the photo but rather the pink monofilament stuff you get (got?) in Ratio signal kits for forming the handrails.  Following discussion on the 2mm VAG I changed this for 0.25mm wire which I fitted by drilling holes in the ends and threading through, fixing in place with super glue.  There has been some discussion on the view of the inside - I tried without any success to take a picture of the inside but will have another attempt with daylight rather than flash tomorrow (it being just after 2100 here as I type).  I do know one thing - when you hold the finished product up to the light, you can almost see though the side planking so I think it is a bit too thin to do much with - there is the option of gluing styrene strips on the inside to look like planking if it is something which matters to the individual.

The side of the chassis in shot has the brake shoes - the other side is shoeless and leverless as this is what the photos provided to me by members of the VAG show.  I wasn't particularly surprised at there being only 2 of the 4 wheels braked but I was surprised that the lever is only on the brake side, not on both.  Someone will doubtless tell me if I got it wrong - the pictures are old after all...

Monday, August 1, 2011

Diorama

I joined the N Gauge Forum over the weekend (it is here if you haven't found it) and found my way to a diorama challenge (here).  Now my local model railway club has as one of its sections in its Annual Model Making Competition a Diorama section which is limited in size (which tends to cause issues for 7mm modellers who can't get anything in and for some 2mm modellers who think they should fill the space, although I have it on good authority it is a maximum size limit, not a minimum one) and which for a variety of reasons isn't frequently contested.  I had a go a couple of years ago and along with the other entry was fouled out by the 7mm modeller judge (both entries being N and he didn't like them apparently!).  Since I am banned from 3 sections this year (on account of winning them last year - see here for details - I thought I might as well kill two birds with one stone and use the same entry for both.

I came home from work early today owing to a massive headache - not sure if it is what my daughter has been home from school for 2 days with or something else - but after a siesta and some drugs (caffeine mostly!) I found myself a 4x6 photo frame and nicked the bit of hardboard which was in it (something to replace later no doubt!) and made a start.  The photos were all taken today and show progress.

Because I don't like straight lines, I put my track across the board on the angle.  The sleepers are actually 2mm ones which I got from the bloke who I call "The Dealer" as he was the one who sent me my first 2mm "hit"
My preferred method of putting down these types of sleepers is to use Amity's wide double sided tape.  This then means, with some thin DS tape next to the sleepers ballasting is simple.  The surrounding dirt is washed out sand from a road graded down to get it as fine as possible on neat PVA glue.

Leaving space for the chosen building (my scratch built cattle dock - see here and here for the more interesting parts of the story) the green was added after some Woodland Scenic brown.  I left the ruts from the cattle lorries backing up to the dock visible - not sure if this would be true in the UK but certainly would be here - assuming the grass was that green!

Cattle dock in place - it isn't fully glued down, just a little bit so it doesn't fall off.  It is, after all, destined for Swallow's End (which will progress, dear reader, when I sus the TOUs!)

Rails added, along with the fence and some future customers of the facilities watching over the fence.  Still to do some weathering of the track - I don't think it would have stayed that clean for long after building and I don't know it would have been replaced to such a neat standard either!  There is still some things to do on the dock itself - tap, water trough etc and I am considering a light.  Either way, quite pleased with the afternoons effort.

Monday, July 25, 2011

NGS Kit 17a Cartic 4 - Part III

Having had a couple of late nights watching Cadel Evans go around France on a bike (and didn't he do well in the end?) I had plenty of time to do something about painting the Cartic set.

Getting hold of primer (well, my preferred brand) out here is impossible as none of the hardware stores carry the brand.  Fortunately, I found a tin down stairs which I must have brought up from Brisbane at some stage so progress was made.

Spray primer - check.  Spray with local dark blue as an undercoat - check.  Wait patiently for it all to dry properly (in winter, out here...)  - hmmmm.  I did eventually get to the point where I could resume painting without wrecking anything.  Brush Precision Rail Blue on sides.  Find I don't have Rail Grey and sub-Freight Grey (1948-1964) instead figuring that the pics Paul Bartlett has uploaded of these to his web which I will use for weathering inspiration will mean that the exact shade of grey is moot.  White chains, ladders and brake wheels.  Axle boxes yellow with red stripes.  Buffer beams black - instructions found after the event say GW Chocolate...  Again, I don't think it will matter much when weathered.

Photos below.  Sorry for the iffy quality.  Taking pictures of white proved to be a little bit interesting this evening so I will have to have a fiddle.  All that is left is to wait for the NGS Transfer Officer to finish off said transfers and get a set - then weather the whole thing.  I would love it if Oxford Diecast produced some Ford Cortinas but until this happens (and not being a car buff) I guess they will run empty. 


Thursday, July 21, 2011

Cartic Video

For those who were interested to see it in action, here is the model running behind my blue Cl 14.  No progress on painting or what not as yet - hopefully futher work at the weekend.

Tuesday, July 19, 2011

NGS Kit 17a Cartic 4 - Part II

Progress has been made with the Cartic in as much as all the nickle silver detail bits have been added along with hooks on the buffer beams left over from 2mm chassis kits.  I had attempted to fit the treads but have since discovered that trying to solder Stainless Steel to brass doesn't work!  I will glue these in after painting I think.

 The photo above shows one of the joins between the inners and outers (I think - might even be between the two inners to be honest - I don't remember!)  The design of the ladder makes it very easy to have it sitting out away from the body side.

The buffer beam detail - I put the hand brakes on bits of 0.3mm wire and then drilled holes so these stand out from the sides, just like the ladder.  The ladder at these ends is longer than the other ladders - pay attention...  No, I didn't initially.

Unfortunately the photo I took of the whole unit doesn't really work on this blog - to skinny owing to the way in which it is positioned. 

Amity suggested I should video the set going round the Kato test track and post it - if you are keen to see it in action, drop me a line at sithlord75@bigpond.com and I'll see what I can do.

Saturday, July 16, 2011

NGS Kit 17a Cartic 4 - Part I

For some time, I have eyed off the Cartic 4 kit from the NGS as being one of those kind of vehicles which would be interesting to have.  It was going to be a Rule 1 kit until 18 months ago when I decided to add the BR Blue era to my list of interests - a bit of research showed that a train of Cartics would be acceptable in this period and so it moved up the list from Rule 1 to "needed" (for a given value of needed as my wife says!).

The NGS advises that this kit is advanced (the website also says it comes with decals but mine didn't - I will have to chase this up but I may have older stock!  No matter as I will be getting at least 2 more) but I think, so far, that it would be a good introduction for someone who is comfortable with building plastic to move into brass - from my experience, it is shake the box, follow the instructions and voilà.


Photo 1 shows progress at the end of the first evening.  The plastic bases had been taken from the box the kit comes in, cleaned up and glued together.  I found that by putting them out in order, I avoided gluing the wrong bits to the wrong bits.  Next was putting the bits in for the articulation.  The loops can be shortened as desired for closer coupling - I shortened mine to run around the Kato 315mm radius set track curves as this is the tightest my layout curves will be.  Apologies for the ruler being upside down, but it does give an indication of how long the unit is when completed.

 This photo shows the first of the inner units folded up and in the jigs ready to solder.  The instructions say if you do it properly then you can move it around without if coming apart.  I must have done it correctly because that is what I found.  Taking the time to make sure the top deck is a drop-in to the locating channels on the side is the best approach - just like it says on the page.  I soldered mine together but using supa-glue to holding then epoxy to put it all together is certainly an option.

The two inners done - this was done on the second evening of progress and took around half an hour.  The second was certainly faster than the first and by the time I started on the outer units, I had dispensed with the jigs.  Once I had the two inners done, I checked to make sure they were still clearing on the Kato oval.

The end of the second evening.  The unit is basically complete as all which is left to do is add the rails and other nickle silver detailing parts, then paint (Rail Blue in my case) and source some transfers.

Friday, July 15, 2011

Friday Night Update - 15 July

I have had a busy couple of evenings.  Firstly UFO wise 6 HAA hoppers have been transferred having been backdated from sectorisation yellow to BR bauxite.  While the number panels don't match the RTR ones, I am not too worried owing to the perils of NVD and the fact that the complete train is 21 vehicles which I suspect needs a bit of variation.  These are the Farish HAAs, not the Peco nor Minitrix.

I have also made a start on three 10' wheel base brake vans as I discovered sometime ago that I don't have anywhere near enough brake vans.  I always thought half a dozen would do, but by the time I make up a couple of shunt trains, two block coal trains for the St Alban's Gas Works there isn't much left over so a few more are now in the pipe line.  I suspect it may end up being "you can't have enough brake vans" but time will tell.

Finally, a busy evening with the glue and solder has seen significant progress made on my Cartic4 from the NGS.  Pics and its own entry will be up over the weekend.  I have been very surprised at how easy the kit actually is.  Either I have developed my skills to a greater point than I think or the kit is genuinely easy provided you take your time - I suspect the later and all credit to the designer whoever it was.

Tuesday, July 12, 2011

UFOs

Another episode of UFO sightings tonight.

As mentioned, I got a package of stuff from the NGS shop before their annual holiday and it contained a number of packets of transfers - one being MMT593 for Catfish, Dogfish and Mermaids.   I had obtained from various sources 7 Dapol Dogfish which I have painted black so they all match (this being the easiest colour to do so with and thus making them useful for most of my eras).   Naturally those repainted had no numbers and those which I didn't need to paint had the same numbers (yes, I know there were a number of options but I didn't end up with a variety of black ones) so to make things simple I removed the numbers from the 3 black ones as well thereby meaning I had to transfer all 7.  I had a look at Paul Bartlett's site as a means of checking where to put things as the two books I have with Dogfish in them have them in Dutch so not helpful.  As expected, there were a couple of useful shots there and so on with the project. 

To put 42 transfers on takes a bit over an hour I discovered - now all I need to do is a "bit" of weathering, make up some loads and job done.  In the meantime, I have replaced the Rapidos with short and medium shank Unimates from Red Caboose (sadly, these no longer appear to be available - very handy for close coupling fixed rakes on non-NEM stock) which makes the Dogfish handed.  The end wagons still have a Rapido fitted at the outer end to enable any brake van or loco to haul them.  I suspect they will most often be seen with an 08 (either Blue or Black when the Black one becomes available) and a Shark.  As it stands the control wheels are all at the same ends of the wagon - I might change a pair around for varieties sake.

Friday, July 8, 2011

Sealion


About a week ago, a parcel arrived from the NGS Shop which contained one of their NGK004 Sealion brass kits.  I had purchased one about a year ago but had managed to turn it into a learning experience rather than a model - I discovered that my then soldering kit wasn't up to something like this but was more suited to wiring control panels and the like.  Since the 1st kit, I have obtained the DSE temperature controlled iron and built a few more etched kits so I revisited the scene of one of my heroic failures and had a second go.  Result above.

I am now in the position of trying to work out how to best fit the bogies.  The kit was designed with, I think, Micro Trains bogies in mind (as these were what you could get) but now the NGS has their own bogies and these were included.  A dummy run suggests that the ladders or hopper are going to get in the road so not sure if I did something wrong yet.  More to come.

Tuesday, July 5, 2011

Trees - Part III

I have managed to find time (with grateful thanks to Amity!) to get the tree finished.  At the end of the last episode, the tree had had the first coat of brown No More Gaps.  Since then, a second was applied and this gave a better finish as it covered the wire a bit more and was able to take some brush strokes to help simulate the bark effect.  So what do you do next?  Paint the tree of course!


The photo above shows some of Amity's acrylics which I borrowed to work with.  White, Burnt Umber, Burnt Sienna, Black and Raw Umber.  These were mixed around to give various shades and then applied to the tree frame.  Finally I dry brushed some moss green on what will be the northern side of the tree, just to see how it looked.


Above we have the painted tree.  In the bright winter sunshine of Outback Queensland, the wires are still noticeable but I was more interested in covering them up on the main trunk.  Not sure if it is as good as I could have done it, but too late now as the tree is finished! The green tinge is just noticeable with bits of grey and different shades of brown showing. 

I used Woodland Scenics FC183 Medium Green Clump Foliage for this tree.  I prefer to use the Heki mats but I don't have any here in Longreach and getting some would take a bit too long and I am keen to get this project finished.  The bag is one I have had for some time, so I will use it up on Swallow's End - although there may be a couple of Heki trees on the layout by the time it is finished.


The finished tree in all its glory.  Must be High Summer judging by the amount of foliage!  I used a spray adhesive and piled it on, waited half an hour, shook the tree (so any loose bits fell off) and repeated until I was happy with the coverage.

Making a tree is a time consuming process and it could be argued that, unless you are modelling a feature tree to match a photograph of your chosen prototype, not worth the hassle.  However, since I had the materials at hand, except the No More Gaps (which was a fiver I think - and will make quite a lot of trees assuming it doesn't go off in the tube while it is waiting!) all it really cost is time - and it is one way of filling in an evening or 3 and still doing some modelling.

Friday, July 1, 2011

Trees - Part II

My parents have been visiting Longreach this week for Darling Daughter's 5th Birthday so railways have been interrupted, despite being on half year school holidays.  Nevertheless, I have managed to get a few hours in here and there and progress has slowly been made on a couple of projects.

One of these projects has been the tree to show Amity how to do it.  Unfortunately I forgot to take a picture of the step between the last picture of Part I and the first of this series but basically you keep twisting the wire down into smaller and smaller branches and then solder them all to provide a degree of stiffness.  I had originally thought about adding some lower branches but in the end left them off.

The first picture of this series shows the finished tree having been washed to get rid of the flux residue (water as hot as you can stand it, soap and an old tooth brush) and then painted with some grey etch primer to give the next step something to key to.

The next step varies from person to person.  My preferred method is to use the product shown in the above.  Not sure what the UK/US or other places product is.  It is a water clean up, flexible filler which usually comes in white, but I discovered about 15 years ago, also comes in brown making it a bit more of an ideal base.  As it is flexible, I don't solder the branches solid as I am then able to make adjustments depending on the final location of the tree - I don't make trees to fit places to order, I make trees as something to do and then use them on layouts so the tree has to be made to fit!

The last photo this time round shows the first coat of filler applied.  It does a good job of filling in the wires and smoothing out some of the more un-typical lumps and bumps of the branches and trunk.  Depending on how well it goes, it maybe enough at this point to then paint with artists acrylics or oils depending on preference.  This one will get a second go of filler before that step.  The filler dries darker than this - I will try and remember to take a picture of the dry before I start with the painting!