Showing posts with label N gauge. Show all posts

Saturday, July 16, 2011

NGS Kit 17a Cartic 4 - Part I

For some time, I have eyed off the Cartic 4 kit from the NGS as being one of those kind of vehicles which would be interesting to have.  It was going to be a Rule 1 kit until 18 months ago when I decided to add the BR Blue era to my list of interests - a bit of research showed that a train of Cartics would be acceptable in this period and so it moved up the list from Rule 1 to "needed" (for a given value of needed as my wife says!).

The NGS advises that this kit is advanced (the website also says it comes with decals but mine didn't - I will have to chase this up but I may have older stock!  No matter as I will be getting at least 2 more) but I think, so far, that it would be a good introduction for someone who is comfortable with building plastic to move into brass - from my experience, it is shake the box, follow the instructions and voilĂ .


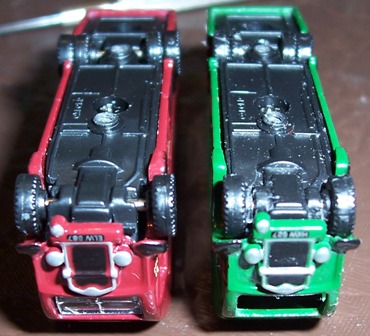
Photo 1 shows progress at the end of the first evening.  The plastic bases had been taken from the box the kit comes in, cleaned up and glued together.  I found that by putting them out in order, I avoided gluing the wrong bits to the wrong bits.  Next was putting the bits in for the articulation.  The loops can be shortened as desired for closer coupling - I shortened mine to run around the Kato 315mm radius set track curves as this is the tightest my layout curves will be.  Apologies for the ruler being upside down, but it does give an indication of how long the unit is when completed.

 This photo shows the first of the inner units folded up and in the jigs ready to solder.  The instructions say if you do it properly then you can move it around without if coming apart.  I must have done it correctly because that is what I found.  Taking the time to make sure the top deck is a drop-in to the locating channels on the side is the best approach - just like it says on the page.  I soldered mine together but using supa-glue to holding then epoxy to put it all together is certainly an option.

The two inners done - this was done on the second evening of progress and took around half an hour.  The second was certainly faster than the first and by the time I started on the outer units, I had dispensed with the jigs.  Once I had the two inners done, I checked to make sure they were still clearing on the Kato oval.

The end of the second evening.  The unit is basically complete as all which is left to do is add the rails and other nickle silver detailing parts, then paint (Rail Blue in my case) and source some transfers.

Sunday, May 15, 2011

GWR P19 - Part III

The long term readers will remember in August last year (my doesn't time fly) I obtained via the good offices of Richard the NGS Journal Ed some GWR P19 wagons, from which the Grampus has its roots.  While waiting for glue to dry on the landscape attempts on Swallow's End I thought it would be handy to have loads for these wagons. 

My first thought was to use the Woodland Scenic Light Grey ballast I have been using on SE but I am thinking of putting that to use for loads for my 7 dogfish and so I have gone for used ballast - which means some finely sieved bedding sand which I have glued to some thick card (as this didn't warp, unlike the plastic I used for mk1).  All up, very pleased with the afternoon's efforts - which is more than can be said for the landscaping but progress is progressing on that front and I am hopeful of photos by the end of the week.

Next job however is to do a stock take and get ready for June - UFO/FO month Down Under.

Monday, December 27, 2010

Oxford Diecast Horsebox

Amongst the various bits and pieces I received for Christmas was three models from Oxford Diecast which were given to me by my parents.  One of the three was the Southern Railway liveried horsebox and as it happened a couple of days before Christmas the December/January Magazine from the 2mm Association arrived.  This contained an article by Matthew Wald in which he explained how he had modified the Oxford offerings of both the mechanical horse and horsebox in LNER livery for Copenhagen Fields.  Given that I didn't really have a need for a SR liveried horsebox (an LMS one now...) I thought it would make a good guinea pig to try out what Matthew did for myself.


The first thing to do was to take the horsebox out of its box and dis-assemble it.  Like Matthew I found the glazing didn't want to come out neatly and so it is the pile on the right hand side.  Apologies for the poor quality of the photo below but I had finished the project before I looked at the photos on the computer or I would have taken a better one.  For the benefit of readers who aren't members of the 2mm Association, the wheels need to be cut out of the chassis.  For the steering axle at the front, this I found was easiest by folding the seats forward and nicking the two bits of plastic holding the axle in.  For the 4 wheel driving axle, this was removed by slicing from below.


The main surgery is in shortening the axles.  For the fore axles I cut in half and then filed down the ends.  I also filed the chassis a bit, offering the whole up to the body until I was satisfied the wheels were now sitting in the wheel arches, and not protruding.  The aft axle I was able to take the wheels off, file the wheels down at the back, drill the hole a bit deeper and reassemble it all.  Again, offer it up to the body in the chassis until satisfied with the fit.


Once happy with the axles, reassemble it all and glue the wheels in.  The photo below shows the SR one next to an unmodified BR liveried horsebox.  It shows the changes to the wheels very clearly and demonstrates why it is worth the time.  Speaking of time, this was the work of the lunch break during Day 1 of the Boxing Day Test - and a Test which wasn't worth watching if an Australian supporter!


Matthew filed clear plastic to fit for the windows.  I used Microscale Krytal Klear.  The side windows were straight forward but after a couple of goes with the windscreen and not being happy with it, I eventually filed around the original and stuck it in place with the Krystal Klear.  Prior to doing the windows, the body was painted with Humbrol 49 - Matt Varnish.  Any similar product will do the trick and the timing in the process is arbitrary.  It certainly helps to take the "toy" out of the model.  I plan on giving mine a light weathering too.


So the finished model.  Remember that at NVD the windscreen looks a lot better.  It wasn't until I was looking at the photos that I noticed the fogginess.  Having done this, I plan on doing the BR one to match and then looking at the other Oxford offerings to see what can be done - perhaps wing mirrors?  I haven't found a good enough photo to see the position yet!


Thursday, December 16, 2010

DCC conversion

I had a go at converting a loco to DCC last night.  In this case, I started small converting my model of 45 114 following the pretty straightforward explanation (with pictures - I like pictures!) found here Farish Diesel DCC Fitting.  I had to remove quite a chunk of the metal from the end with the chip and socket (I decided to put the socket in so I can put a blanking plug in to run on DC - it also meant if I did any dodgy soldering, I wouldn't be damaging a chip) and it still isn't fitting quite right so I will probably have to unsolder it all, pull the whole loco apart and remove some more metal.  The blog which I followed suggested a milling machine would be best but I found using a file just as good - if a bit time consuming.  The best part was, having put it all together it worked - and has been programmed using my NCE ProCab.   So now to the next - a Class 33.  The grand plan is to do all the blue diesels in DCC and having done this one, it should be a doddle - although I will have to work up to the 03, 04, 08 and 14 I think.
 
 
EDIT - a couple of hours later and I have removed some more of the metal under the chip and it all fits perfectly.  I had to sacrifice the cab moulding at that end, but I am thinking of detailing the buffer beam at the other end in any case so the end with the cab in it will be leading.  It isn't noticeable unless you look, but knowing it is missing, I will see it every time that end leads if I don't make it a one way loco.  Not sure what train it will get - possibly a Freightliner container set when I get around to sorting the collection I got on eBay a couple of months back.

Wednesday, December 15, 2010

Deltic Downunder

Blogger has enabled the upload of video and I thought my most recent arrival would make a good test subject (sorry for the poor quality - I will see if I can do a better job and edit it later).  This is Deltic, still running in.  I didn't realise it came with directional lights (probably should have since this seems to be standard on all new diesels these days) and to be honest, I am a little bit disappointed.  I don't know that it will be operational with no train all that often so the red will have to go.  The white is quite bright and there will need to be something done to remove the inner glow in front of the cab.  At the slowest speed I could run it at on pure DC the lights were out.  Once it has run in for the hour each way, and I have checked the lubrication, I will stick a chip in it and see how slow it will go on DCC.

As one of those "it doesn't really fit my plans but gee whiz" locos I am very pleased with it.  I do model LMR so it is appropriate (which tends to boggle the mind a little as I always associated Deltics with the ECML) and I have seen the real beast so it was snapped up when it was announced.  And here for Christmas too.

Saturday, October 2, 2010

Return of the UFO Box

Got back from Brisbane after a short 12 hour drive (normally closer to 13 hours so happy with the run!) on Wednesday and didn't do anything train wise other than unpack the box on Thursday. Part of the reason for the trip down was for me to do a stock take (which turned up a few locos which I hadn't listed and an increase in the UFO box!).

Friday night therefore had the transfer kit out and a start made on the UFOs. In this case, I fixed the numbers on one of my Std 4 tanks (80103 - missing a 3) and A4 60012 (although I still can't photograph the pair as the other is in Brisbane!) which needed one of the 2s fixing.

Next I made a start on the pile of un-numbered locos. I have had a pair of 8Fs waiting for numbers for a few years now and I went through my database to find some suitable numbers. As a result I picked 48421 and 48536 as I have pictures of both of these locomotives pounding up the last few yards to Ais Gill summit. As this is the intended location of my next large exhibition layout (I am going to have enough space that the refuges will be included at full length of 33 wagons) it made sense to do these.

Next on the list was renumbering one of my two 4Fs (can't see much point in having two 44370s). I had a quick read about them to find that until 44207, they were right hand drive. This narrowed the choice and I had a look to see what digits I had a lot of. First up I thought 44561 as this would be useful to run on Ben Lawson's Sturminister Newton layout (the only pic of a 4F on the S&C was a RH drive version - the Farish model is LH drive). Then I discovered (just in the nick of time) that the proposed number belonged to one of the S&DJR quintet - and they were RH drive too! I moved the number up two to 44563 - one of the 1927 LMS build locos authorised by Stanier.

Next on the list is finishing off my pair of Garratts (one side done, other side needs to be done on both 47975 and 47982), putting the name plate and numbers on D9020 "Nimbus", finding the picture I have somewhere (not logged on the database yet - curses!) of a Q1 hauling a rake of bogie ballast hoppers and a Shark to renumber my Q1 from 33030 to whichever loco it is, and sorting out Class 04 No 11217 to become 11102 for the W&U Tram - although the front windows will be wrong.

After that - there is a whole fleet of GWR locos needing number plates and an Ivatt 2-6-2T needing lining and numbering. Then there are the wagons. So I will be busy for a few weeks with that lot.

Sunday, August 15, 2010

GWR P19 - Part II

I didn't get much done over the week - and this is delayed given my self-imposed deadline of Fridays for updates - due to having my parents visit for Darling Daughter 2's third birthday (where does the time go I ask myself!).

What I did manage to get done was putting the transfers Richard Bardsley sent out for the P19 conversions of the Parkside Dundas Grampus. This is the first time I have used full side transfers and I have mixed feelings. It is indeed handy to put it all on - painting the side gloss white and then putting the transfer over, touching up around the edges being the plan. The one in the picture is the odd one of the five - I patch painted white and then put the transfer on in sections. To be honest, I am not sure which is neater - certainly one transfer instead of four or five is appealing but I think the finish is a little better using the cut out method. The biggest issue I now have is what to seal them with. My normal method is to use Humbrol Matt Clear (No 49 for those of you playing at home) but I think this may react badly with the Robbie's Rolling Stock transfers. I have the bits cut off the one above so I might use them to test.


In other news, a batch of stuff turned up from Ultima - LNWR coach and horsebox, Midland meatvan (thanks Alan ;-)) and a pair of R0 Maunsell brakes. I made a start on the horsebox this afternoon - progress has been good which I am pleased about since the instructions are still being found! I have to source a roof. Fortunately I have found a handy picture at http://www.gauge1trains.co.uk/p/horsebox.html which has helped enormously.

Saturday, July 24, 2010

Nuclear Power

My most recent N Gauge FO is this TPM FNA Nuclear Flask carrier kit. Transfers are the recommended Fox F2190 pack and there are plenty to put on each side. I still have to weather it (probably use this as the subject of a "shows you how" type post similar to the Jinty renumber below) and finish the train (HEA hoppers and a brakevan for early 80's working - although most likely the train will get 73101 in Pullman at the front - just to be different!). Quite an easy kit as it is resin with some brass and nickel silver (I think) detailing bits and plastic bogies. I seem not to have put the bogies together well as they aren't running as smoothly as I would like so they may be candidates for 2mm FSA nickel silver etches as I get these running much better.

Saturday, July 3, 2010

Slackness

I set myself the goal of making a post weekly when I started this blog back at the beginning of the year - and I figured that I could at least make a fortnightly post even if the weekly was ambitious. I noticed however that June passed with only one post. This I put solely down to work and the demands of the end of semester reporting which saw me write 110 reports (having administered exams or marked assignments for the students whom the reports were about).

So with school holidays a week old and Hollie's 4th birthday party out of the road (she had a Thomas the Tank Engine cake - I will try and dig up a picture as it looked pretty good if I do say so myself!) I have gotten back into it over the last few days.

Mum and Dad came from Hollie's birthday and brought with them some more of my UFOs which were stored at their house in Brisbane. This has enabled me to pretty much finish off the rake of 10 Peco TTA wagons to travel around behind one of my Blue Cl 33s. I used Fox transfers for this - their sheet F2120 which is for TTAs and includes Hazcem panels and pretty well all you would need for 10 wagons which is good. The bad - well they only have enough TTA Tops Data panels in white on black for 9 wagons. Incidentally they have enough black writing on white backgrounds for 6 wagons yet enough of everything else to do 10 wagons. You would think, at least I did, that if there are 20 Hazcems, 20 No Naked Lights, 20 etc (you get the picture) there would be 20 white on black and 20 black on white so people could do 10 wagons all up.

Anyway, since our good digital camera ended up in the washing machine on Monday, there are no photos until there is some good light tomorrow - and hopefully it will be a nice enough day tomorrow to do some spray painting which will see a few other things closer to being finished too.

Monday, June 14, 2010

Still plugging away

The UFO list is shrinking - but only by degrees until this weekend so nothing really to report. However, this weekend has seen some significant progress as a number of things have moved from the UFO pile to the FO pile. This is because I got a few packages from Shop 3 of the 2mm FSA, the NGS Shop and from Iain Smith who kindly organised some stuff from BHE at the NGS AGM.

First off is the Ultima Giant which was mentioned back in April. I got a set of bogies from the 2mm FSA (the kit comes with a set but the 2mm ones are neater and more 3D, particularly with the springing detail) and cut up a set of transfers from the NGS (MMT575 - actually for Siphon G and H and a few other bits and pieces but the right colours and it is possibly to cut GIANT out of Paddington and get a number etc). I am still fettling the couplings - the current position has too great a gap although it does look OK with some Dapol GWR liveried Collets.

Next are two of the 5 Chivers Tube wagons I have built. These are now on etched chassis from Shop 2 which means they run much better than previous. When I got the transfers (MMT072) I found that there was only one set for a fitted wagon and 4 for unfitted. I had a look to see if I could cut and shut some for fitted wagons (all 5 of mine were painted bauxite) but decided this wasn't practical so I painted 4 grey and will sort out the vacuum cylinders (naturally enough, the one I didn't paint hasn't got one and 2 of the 4 I did I had glued one on).

Other activity has seen my Ultima Thompson BG get sorted - I haven't taken a satisfactory photo yet - and my Siphon F get transfered (same pack as the Giant - at least I didn't have to cut up letters to put Siphon on it!) but the bogies need painting and fitting. I got one of the pair of 2mm SR 8' bogies for my SR Luggage Van done last night and will try and get the other done tonight. No transfers yet for this - looking to see if there are any on the MMT551 sheet I have for my Chivers CCT/PMV's which I can use. At NVD it is more the look than the accuracy (the Giant proclaims empty to Paddington on it - trust me!) so we shall see.

In other UFO news, transfers are in hand for a few other projects - but as the wagons in question are presently 1200kms away at my parents it will have to wait. Hopefully when they visit at the end of the month for Hollie's 4th birthday, they will bring same with them.


Tuesday, May 25, 2010

Renumbering a loco.

Last weekend a question was asked on the N Gauge Yahoo Group of which I am a member about changing the details on locos - numbers, crests etc. I thought a series of photos and a longer explanation may be of use.

This is the kit I use to renumber a loco. Normally it isn't as neat as this :-))

Going clockwise from the right: Fowler Locomotives by Brian Haresnape. The loco at the bottom of the dust cover is the subject I am planning on modeling. The white lid to the bottom left is from one of the girls baby jelly jars. 5mls of water goes nicely into this (using a syringe) and it is here the transfers are soaked prior to affixing to the model. Swiss Army pocket knife. I use the scissors (and although it is currently MIA, the toothpick is handy for poking transfers around on models to position them). Small (00) paint brush. Bamboo kebab stick. Bottle of nail polish remover (Coles Persona for Australians reading this - non-acetone variety). Bachfar Jinty purchased from Ebay (needs fettling to get it to work properly but was purchased with a view to putting a 2mm chassis under it from Fencehouses) and under the Jinty some Fox 10inch numbers (FRH 2004) and some small Late Crest transfers from Modelmaster via the NGS shop (can't tell you the code for those).

The more knowledgeable engine pickers of Jinties will have spotted the anomaly on this one already. The Darlington style number position. Apparently, according to the caption for the same photo inside the book, it was shopped at Darlington in 1964 and appeared ex-works with its number painted on the tankside instead of the bunker. As the loco was withdrawn in 1966 I suspect it looked like this until then. I thought, as it was something different, I would model it. A bit late for my normal steam operations but Rule 1 and all that.
As an aside, it is easier to work from a photo - I changed a Dapol Ivatt from 41271 to 41220 on the basis I have a photo of this loco at St Alban's Abbey. Another destined for 2mm work.

I put the nail polish remover on with the paint brush over the bits I want to remove. Works really well on plastic (like the smokebox door) and not so well on the metal bits of Farish locos. Works fine on diesels (having done 60078 out of Mainline freight into "something secret") as these are plastic bodies as are the Dapol ones. No dramas on Farish tenders to date either. You can see where the number (47338 if memory serves) and crest were.

The renumbering in progress. The photo shows the first 4 just above the access to the center sandbox (I assume) so this gave me a starting point. The skewer, having been used to gently scrape the old number and crest off is now being used as a poker to get the new one aligned.


The finished job. Took about 30 mins from start to finish. If there are any dramas with taking paint off this is easily fixed with a bit of Humbrol No 33 (Matt Black). Obviously doing something like a Jinty or 4F (which are unlined) is a good place to start as any mistakes are more easily rectified. With a bit of practice and confidence... See Victoria earlier on this month.


Saturday, May 8, 2010

Condemned Coach saved by SVR


When Dapol first produced their Collett Coaches I was keen to get some Blood and Custard ones to supplement my Mk 1 fleet. Unfortunately Dapol's choice of colour wasn't too great. Yes, I know there are photos showing a more Oranges and Cream version than the LMR and ER versions but the four I got were a disappointment.

I stripped one down with the intention of repainting it - and even had a couple of goes. As none of these were taped up well enough to prevent runs and didn't use an airbrush, the result wasn't too flash. I even had a go at painting it plain maroon but the maroon I used didn't match the rake of Dapol maroon coaches.

As part of the "finish 10 UFO challenge" set by my wife, finishing this coach was on the list. Having given the spray red a go and deciding it was a miss, I stripped the coach body (again) and had a thought. The idea of a condemned coach being saved by a preservation society would work I thought, and be something different in a train running in my Banger Blue collection.

So tonight, while watching the Pies beat the Roos (I am assuming that is what will happen, the score is pretty lop sided as I type) I dirtied the coach up more - only used Humbrol 118 and 33 on it; the rest of the effect is from the stripping process - and then wrote the condemned symbols and wording along with the SVR (I have enjoyed my visits to the Severn Valley Railway and look forward to taking my family - and they have a couple of these coaches AFAIK) and then used some of Amity's vinyls from her Craft Robo to make the tarps. Hopefully these will bed down a bit more as time goes on.

By doing it this way, should I work out how to do a better job the coach may be restored - just like the real thing!

Let me know what you think either by leaving a comment, post to either the VAG or N Gauge group or direct email.

Victoria


Way back in 1996 I purchased a second hand Peco Jubilee with the intent of running it as 5565 "Victoria". As I got more interested in the British Railway scene (Victoria was one of the earlier locos I purchased with no real purpose - I didn't have a layout, didn't have a plan but knew, having been born in Victoria, that this was one of the "must haves regardless") I ended up settling on the Midland Region in the 1950's as my main N gauge focus (although recently the time period between my and my wife's birth years is becoming a bit of a theme in N as well!). This meant that Victoria (as yet undealt with and running with no number and no name) was repainted into BR Green and lined using Fox transfers. Fox also provided the numbers. All this happened in around 2000-2001 after St Alban's Priory had been built, exhibited and was on the way to the first of its many tweaks!

Fast forward a bit and the BRMA (Q) modelling competition in 2007. I managed to win two sections and thus got a small consideration. This consideration was turned into, finally, brass name plates (which hitherto I had been unable to source), from, I think, the good offices of Bob Jones and Fencehouses.

Last night, I got a roundtuit and, 15 years after purchase, Victoria is finished in BR Green with name and number as required. I haven't done the numberplate on the smokebox - no numbers small enough in my collection of transfers and the usual suspects (Guilplates et al) have been unwilling to do a numberplate for me (which is a shame as the Jackson Evans ones from the NGS shop come with numberplates so presumably it can be done).

As an aside - Trafalgar (a similarly dealt with Peco Jub) also got its name plates last night to finish it off. 45682 is using the nameplates what come with 5682 the Farish Jubilee. Amity's Red Jub is waiting for her to get her train mojo back to renumber it and put the Queensland plates she has on it.

Monday, May 3, 2010

Manors

They have arrived!!! My pair of Ixion Model Railways (http://www.ixionmodels.com/) GWR Manors arrived on Friday - a day earlier than the world wide release date of 1 May, although since we don't have Saturday mail deliveries in Australia and Monday is a public holiday here in Queensland I am not complaining!

I originally ordered "one of whatever you are producing" back when Ixion first announced themselves in 2007 - and according to Lindsay O'Reilly, I was their first order! As time progressed they announced that "whatever" was going to be the Manor - in three versions of green and a limited run of BR black. I picked the black one as it was more suitable for my time period of the 1950's than the other options.

As time further progressed, the limited aspect of the black one was limited only to it being black - 300 of each (GWR shirt button, GWR letters, BR early crest black and BR late crest lined green) were to be produced.

Disaster struck with the initial release being 8% too large. Something back in the 1970's which wouldn't have been a problem was a huge issue in the more discerning noughties. Ixion did a very brave thing and cancelled half the production run and recalled the half which had been released. 18 months later (or thereabouts) the new ones are here, and they are beauties.

If you are a fan of the GWR and model N gauge then you have to have one of these - I am only half of that and have two. Both are excellent runners and haulers - I have had them running on the Darling Daughters trainset with an eclectic rake behind including 7 Dapol light bar ready Collett coaches, 6 Farish Staniers, 4 Farish Mk 2's, 2 Bachmann PRR Coaches from the 1970's, 3 Farish seacows and a couple of coaches of indeterminate parentage.

A YouTube video shows a Engineering Prototype running on Ben Lawson's Sturminister Newton layout hauling 35 coaches. http://www.youtube.com/watch?v=WyyBfEBPALI

Purchase is by mail order only - and due to exchange rate fluctuations annoyingly only from Ixion for those living Down Under. Dapol (www.dapol.co.uk) have the exclusive sales in the Northern Hemisphere and the prices are on the websites.

Saturday, April 10, 2010

Bogie Luggage Van


So this is the current state. The grills need to have the second coat of white on them and then glazing needs to be done. I am toying with either the plastic cut out idea (not sure how this will work as I don't have a template anymore!!!) or using crystal clear (which may not be how you spell it but it will do!). Bogies and transfers to do.
Any one know of a good picture to show the lettering on one of these? Email me or, better yet, leave a comment. If leaving a comment, please leave your location (city/country - no need for street/postcode) as I discovered I am linked to the 2mm website tonight (which I didn't know but it is nice so thanks whoever did that!) and I would like to know who is reading/watching - thanks!
PS - I made a start in front of the footy last night on some GER coaches from David E of the Darkest Essex Group - two more attacked today, again in front of the footy. Bombers won tonight which meant the brake third wasn't finished!

Thursday, April 8, 2010

And Now For Something Completely Different...


In amongst the mail today (well the parcels delivery - one from Hatton's alluded to in the It Moves!!! entry and a second on from Aust-N-Rail www.aust-n-rail.com.au) was these four wagons. They aren't for my British stuff - they are Victorian Railways wagons. In fact, from what little research I have done, they are two of the top 3 types of wagons used in the 1950-1970's on the 5'3" VR system. They are a GY open and three B type vans. The Bs all have different numbers on them as supplied which is nice. The GY was the only red one available on the website - eventually it will be joined by a handful more. The current plan is to run them with a BadgerBits K class but a Aust-N-Rail T class may get a gig sooner. The picture is taken on the Darling Daughters Kato trainset.

Ultima Models

I got the two models shown below on Tuesday (6 April) and made a start on the SR BLV that night. Mostly finished I got it to the stage shown Wednesday morning. The Monster I did on Wednesday afternoon. Both are very enjoyable kits to build.

Ultima Models SR Bogie Luggage Van Dia 3096/3098

Ultima Models GWR Monster (Giant) Dia P18

I blame my mate Ben Lawson for these actually. He got an example of the BLV to run on his Sturminister Newton Layout with his Pines Express set. His blog is here: http://www.rmweb.co.uk/community/index.php/blog/161-neb-from-downunder-n-gauge-blog/ Scroll down if necessary for the pictures of his BLV.

Neither of us have managed to work out a satisfactory way of doing the roof overlay yet.

Next on the Ultima list is their Siphon F and Thompson BG kits - they were ordered last night.

You will notice (hopefully) that they don't have bogies. The BLV doesn't come with bogies and will end up on 2mm FSA 8' SR Steam Bogies. The Monster does come with bogies but I decided they are a bit rough and I will put the 2mm FSA bogies under it too. The kit for the Monster apparently comes with buffers but mine was missing these (if they are supposed to be in there - the instructions have a few things which I noticed could do with updating but Ultima is still coming back on line after a hiatus so fair play). It isn't a big deal as I will get said buffers from the 2mm FSA when I get the bogies. The Thompson needs bogies too so once I work out which type I will fill in my order to Shop 4 - the next order that is! Do UFOs ever run out???

Next job is to prime and then paint. The Monster will end up Humbrol Number 10 with a light grey roof and distressed GW lettering (the plan being to run it in both the 1930-1940's and also in the early BR period). The BLV is going to be Green - Dulux Fiddly Bits Heritage Green for those of you in Australia. Available at Bunnings for not much.

Monday, April 5, 2010

Stuff

We have been having a few computer issues but I will tempt fate and have a go at updating my blog with what has been happening.


The first thing to report is I built, some time ago now, one of the 2mm LMS/BR Buffer Stops.


This looks like it has been the victim of a bit of a hard shunt but is much, much nicer than the Peco version. I am thinking of getting some of the LNWR ones to replace the collection on St Alban's Priory - I will be definitely getting them for St Alban's Abbey when I get around to it. Assuming the rain stops, it will get painted tomorrow - along with a few other things building up.


Tonight I made an attempt on my Worsley Works 2EPB scratch aid. I can't remember if this is 2mm or N gauge - I suspect 2mm as it doesn't fit the Farish Mk1 donor coach at all being too short. In any case, with the aid of the new solder station (not that it is new any more!) no dramas in making up the basic body. Farish Mk 1 roof, cut up chassis for chassis and it is looking ok. All over Blue paint and we shall see how to power the kit. I still have the other coach to do.


The other thing I have started is my TPM 4-VEP insert kit. Again, so far so good with the sides done for the MBSO. Still not sure how this will be powered either. I have TPM motorizing kits to use but the MLV wasn't a great success so now thinking of GWR Railcar chassis. Will have to investigate.


.

Monday, March 8, 2010

Tweaking


I received recently some more of the very excellent N Gauge Society Stove R model. I got some pre-ordered (BR Crimson and Cream, BR Maroon, BR Blue and LMS Crimson) and decided that I had one too many Crimson and Cream and not enough (ie none) BR Crimson. It was the latter which turned up recently (along with some LMS ones for non-NGS member mates). Now I wasn't too impressed with the very light grey rooves (roofs?) and have thus had a go with the good old Humbrol No32 which I favour for things like this. The shot above shows the before and after on the BR Crimson versions. Probably not the right base grey for this livery but works very well with the BR Maroon and Blue versions. I have the Precision Paint colour for Crimson coaches but I find it only works well with an airbrush - not an option out here in the bush and besides, the body is integral with the roof. I am however, having a go with the LMS Roof Grey on my LMS example.


At the same time I was painting the Stoves, I handed off the Dapol BR Blue CCT which had come from the Alton Model Centre (this is ND008 - and one of the early ones. AMC still had it in stock so well pleased for the tip off - thanks TM of ACT). I had managed to win a bid for one on eBay shortly before the tip so I now have two. The roof colour on the original is shown here next to the first coat of No32. I have since done both vehicles and fitted them for close coupling.

Not content just with these, the various finished etched kits were primed and painted on the weekend - the rain has stopped at last and humidity resumed its non-existence. I also painted my recent NGS Gresley BG kit. Dulux Quickdry Heritage Red seems to be a good match for BR Maroon - given that no two painters mixed it the same back then and weathering depended on a lot of things.

Next plan is to finish the BG, fit sides to my Ultima LMS 50' BG and paint the Prestwin shown earlier. After that, it is back into chassis and hopefully the W&U etches will turn up - they are taking an age to come from Darkest Essex.

Wednesday, February 24, 2010

Purchases

I haven't really done much modelling since the last update - I have made a start on converting a Dapol Autocoach to 2mm Standards by making some bogies for it. Still working out what else to do to it (fixing the vents on the roof is high on the list - and I am thinking of putting it in the last GWR coach livery rather than the late 20's/early 30's livery it currently is in).

What I have been doing is getting packages almost every day (the flood waters are down and the mail is getting through). Today's was from the Alton Model Center with a rake of Dapol Collett's in GWR livery - the first batch years ago sold out in a flash and even this run (NC041-NC03) vanished from the likes of Rails and Hatton's fairly quickly. Fortunately AMC had enough for me to get a rake of 8 - and a BR Blue CCT (NB008) from quite a long time ago. Very happy to have been given the tip from a fellow modeller in the ACT.

Other arrivals include a BHE Royal Scot and a Farish Jubilee - the latter for my wife. Hopefully the nameplates for the Jub turn up soon - 5566 to go with my 45565 so we have our States of Origin running on our layouts.

Last night I ordered the chassis for the J70/Y6 locos which we hope to start building in a week or so - although following the arrival of the NGS Journal one is going in my PD Marsh Sentinal kit - which will be numbered for the W&U Y4.