
Amongst the various bits and pieces I received for Christmas was three models from Oxford Diecast which were given to me by my parents. One of the three was the Southern Railway liveried horsebox and as it happened a couple of days before Christmas the December/January Magazine from the 2mm Association arrived. This contained an article by Matthew Wald in which he explained how he had modified the Oxford offerings of both the mechanical horse and horsebox in LNER livery for Copenhagen Fields. Given that I didn't really have a need for a SR liveried horsebox (an LMS one now...) I thought it would make a good guinea pig to try out what Matthew did for myself.

The first thing to do was to take the horsebox out of its box and dis-assemble it. Like Matthew I found the glazing didn't want to come out neatly and so it is the pile on the right hand side. Apologies for the poor quality of the photo below but I had finished the project before I looked at the photos on the computer or I would have taken a better one. For the benefit of readers who aren't members of the 2mm Association, the wheels need to be cut out of the chassis. For the steering axle at the front, this I found was easiest by folding the seats forward and nicking the two bits of plastic holding the axle in. For the 4 wheel driving axle, this was removed by slicing from below.

The main surgery is in shortening the axles. For the fore axles I cut in half and then filed down the ends. I also filed the chassis a bit, offering the whole up to the body until I was satisfied the wheels were now sitting in the wheel arches, and not protruding. The aft axle I was able to take the wheels off, file the wheels down at the back, drill the hole a bit deeper and reassemble it all. Again, offer it up to the body in the chassis until satisfied with the fit.

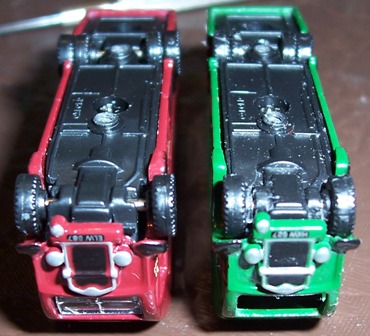
Once happy with the axles, reassemble it all and glue the wheels in. The photo below shows the SR one next to an unmodified BR liveried horsebox. It shows the changes to the wheels very clearly and demonstrates why it is worth the time. Speaking of time, this was the work of the lunch break during Day 1 of the Boxing Day Test - and a Test which wasn't worth watching if an Australian supporter!
Matthew filed clear plastic to fit for the windows. I used Microscale Krytal Klear. The side windows were straight forward but after a couple of goes with the windscreen and not being happy with it, I eventually filed around the original and stuck it in place with the Krystal Klear. Prior to doing the windows, the body was painted with Humbrol 49 - Matt Varnish. Any similar product will do the trick and the timing in the process is arbitrary. It certainly helps to take the "toy" out of the model. I plan on giving mine a light weathering too.

So the finished model. Remember that at NVD the windscreen looks a lot better. It wasn't until I was looking at the photos that I noticed the fogginess. Having done this, I plan on doing the BR one to match and then looking at the other Oxford offerings to see what can be done - perhaps wing mirrors? I haven't found a good enough photo to see the position yet!


No comments:
Post a Comment