Richard Bardsley is a brave bloke - or nuts (there is a chance of both). He decided that the Parkside Dundas Grampus could do with some alternative ends which would provide modellers with the opportunity to produce either the GWR P19 ballast wagon which gave rise to the Grampus or the Rudd, the rebuilt air braked version of that noble fishkind wagon. Having organised same - and presumably found the readies to pay for it - he asked for those keen to have something a little different to put their hands up (or rather into the pockets) and help out.Thursday, July 29, 2010
GWR P19 from Mill Lane Sidings
Richard Bardsley is a brave bloke - or nuts (there is a chance of both). He decided that the Parkside Dundas Grampus could do with some alternative ends which would provide modellers with the opportunity to produce either the GWR P19 ballast wagon which gave rise to the Grampus or the Rudd, the rebuilt air braked version of that noble fishkind wagon. Having organised same - and presumably found the readies to pay for it - he asked for those keen to have something a little different to put their hands up (or rather into the pockets) and help out.Saturday, July 24, 2010
Nuclear Power
My most recent N Gauge FO is this TPM FNA Nuclear Flask carrier kit. Transfers are the recommended Fox F2190 pack and there are plenty to put on each side. I still have to weather it (probably use this as the subject of a "shows you how" type post similar to the Jinty renumber below) and finish the train (HEA hoppers and a brakevan for early 80's working - although most likely the train will get 73101 in Pullman at the front - just to be different!). Quite an easy kit as it is resin with some brass and nickel silver (I think) detailing bits and plastic bogies. I seem not to have put the bogies together well as they aren't running as smoothly as I would like so they may be candidates for 2mm FSA nickel silver etches as I get these running much better.Sunday, July 18, 2010
Taking Stock
Saturday, July 17, 2010
Friday Night Update
Friday, July 9, 2010
Stock for Elm Road
As promised yesterday, here are the three Parkwood LNER Fruit vans. They are running on LNER 8 clasp brake chassis from the 2mm FSA and have been transferred using MMT089 - Ex LNER Fruit vans from the NGS Shop. I used Precision BR Bauxite for the bodies, Humbrol 32 for the roof and whatever the cheapest can of flat black spray I could find for the chassis.There is still a couple of things to finish off - vacuum cylinders and weathering. Then there is the issue of couplings. At this point in time, there will be 6 of these (note the three are all different - one with roof vents and one without in the planked side variety) and they will be joined by 4 Bacfar BR Fruit vans (hopefully I "win" enough axles in the Shop 2 Lottery on the weekend!) in a train which will probably have a J70 in BR Early crest at the front. For Elm Road there will be no need to shunt so I am thinking of using the Matherson Models 3 links (I know these would be joined by screwlinks but finding working ones in 2mm is proving a little hard!) and having this rake permanently coupled. The longer term plan for Outwell Basin would see some being shunted but only 3 or 4 from a train so they would be new builds for the new layout I guess.
Thursday, July 8, 2010
Back to 2mm
One of my first (possibly the first) 2mmFSA etched kits. This was put together with my old soldering kit and as such not done to the standards I am now getting with the temp. controlled iron (and more practice!). It is the first of the collection I am building up for a remake of my exhibition layout "St Alban's Priory". The remake will be 2mm, not N, and will be "St Alban's Abbey" - the actual station I based Priory on. A couple more will be heading Down Under in due course. Please forgive the wonky LNWR - looks all right in real size but enlarged photos of 2mm stuff are cruel!In light of David Eveleigh winning the GJLC with his layout and given it was his W&U kits which lead me to joining, I also cracked on with some stock for Amity's and my planned layout based on the Elm Road stopping place. Unfortunately the weather in Longreach has meant the spraying of the chassis of the 3 LNER Fruit vans hasn't happened so no photos - but all that is needed is the spraying, the fitting and the choice of couplings. These vans are Parkwood ones and have been transfered using the appropriate MMT transfers from the NGS - more details when finished and uploaded.
Saturday, July 3, 2010
Photo update
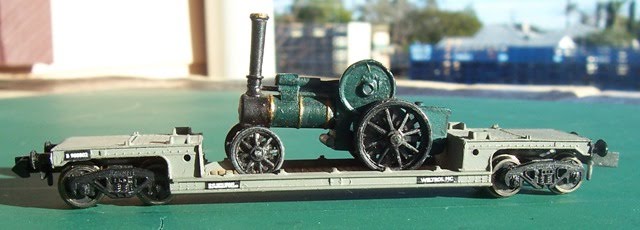
NGS Weltrol - Kit 31. Transfers supplied in the kit.
Chivers Finelines LMS Plate wagon (I have two). This has been transferred using some from MMT072 (BR & Ex LNER Plate/Tube/China Clay) left over from the Chivers Tube wagons mentioned earlier, and some from MMT567 (Ex LMS Long Low/Flat/Mineral Wagons). This is now on the Masterclass Models chassis from the 2MM FSA.
Chivers Finelines LMS Long Low using the MMT567 pack and Masterclass Models chassis mentioned above. I replaced all the Chivers Chassis with the Masterclass ones as I got these to run better!
Chivers Finelines LMS Double Bolster. This used some transfers from MMT087 (BR Pre Nat Machinery and Bolster Wagons) as well as number panels from MMT567. Chassis as above.Slackness
So with school holidays a week old and Hollie's 4th birthday party out of the road (she had a Thomas the Tank Engine cake - I will try and dig up a picture as it looked pretty good if I do say so myself!) I have gotten back into it over the last few days.
Mum and Dad came from Hollie's birthday and brought with them some more of my UFOs which were stored at their house in Brisbane. This has enabled me to pretty much finish off the rake of 10 Peco TTA wagons to travel around behind one of my Blue Cl 33s. I used Fox transfers for this - their sheet F2120 which is for TTAs and includes Hazcem panels and pretty well all you would need for 10 wagons which is good. The bad - well they only have enough TTA Tops Data panels in white on black for 9 wagons. Incidentally they have enough black writing on white backgrounds for 6 wagons yet enough of everything else to do 10 wagons. You would think, at least I did, that if there are 20 Hazcems, 20 No Naked Lights, 20 etc (you get the picture) there would be 20 white on black and 20 black on white so people could do 10 wagons all up.
Anyway, since our good digital camera ended up in the washing machine on Monday, there are no photos until there is some good light tomorrow - and hopefully it will be a nice enough day tomorrow to do some spray painting which will see a few other things closer to being finished too.
Monday, June 14, 2010
Still plugging away
First off is the Ultima Giant which was mentioned back in April. I got a set of bogies from the 2mm FSA (the kit comes with a set but the 2mm ones are neater and more 3D, particularly with the springing detail) and cut up a set of transfers from the NGS (MMT575 - actually for Siphon G and H and a few other bits and pieces but the right colours and it is possibly to cut GIANT out of Paddington and get a number etc). I am still fettling the couplings - the current position has too great a gap although it does look OK with some Dapol GWR liveried Collets..jpg)
Next are two of the 5 Chivers Tube wagons I have built. These are now on etched chassis from Shop 2 which means they run much better than previous. When I got the transfers (MMT072) I found that there was only one set for a fitted wagon and 4 for unfitted. I had a look to see if I could cut and shut some for fitted wagons (all 5 of mine were painted bauxite) but decided this wasn't practical so I painted 4 grey and will sort out the vacuum cylinders (naturally enough, the one I didn't paint hasn't got one and 2 of the 4 I did I had glued one on).Tuesday, May 25, 2010
Renumbering a loco.
This is the kit I use to renumber a loco. Normally it isn't as neat as this :-))Going clockwise from the right: Fowler Locomotives by Brian Haresnape. The loco at the bottom of the dust cover is the subject I am planning on modeling. The white lid to the bottom left is from one of the girls baby jelly jars. 5mls of water goes nicely into this (using a syringe) and it is here the transfers are soaked prior to affixing to the model. Swiss Army pocket knife. I use the scissors (and although it is currently MIA, the toothpick is handy for poking transfers around on models to position them). Small (00) paint brush. Bamboo kebab stick. Bottle of nail polish remover (Coles Persona for Australians reading this - non-acetone variety). Bachfar Jinty purchased from Ebay (needs fettling to get it to work properly but was purchased with a view to putting a 2mm chassis under it from Fencehouses) and under the Jinty some Fox 10inch numbers (FRH 2004) and some small Late Crest transfers from Modelmaster via the NGS shop (can't tell you the code for those).
The more knowledgeable engine pickers of Jinties will have spotted the anomaly on this one already. The Darlington style number position. Apparently, according to the caption for the same photo inside the book, it was shopped at Darlington in 1964 and appeared ex-works with its number painted on the tankside instead of the bunker. As the loco was withdrawn in 1966 I suspect it looked like this until then. I thought, as it was something different, I would model it. A bit late for my normal steam operations but Rule 1 and all that.
I put the nail polish remover on with the paint brush over the bits I want to remove. Works really well on plastic (like the smokebox door) and not so well on the metal bits of Farish locos. Works fine on diesels (having done 60078 out of Mainline freight into "something secret") as these are plastic bodies as are the Dapol ones. No dramas on Farish tenders to date either. You can see where the number (47338 if memory serves) and crest were.
The renumbering in progress. The photo shows the first 4 just above the access to the center sandbox (I assume) so this gave me a starting point. The skewer, having been used to gently scrape the old number and crest off is now being used as a poker to get the new one aligned.
The finished job. Took about 30 mins from start to finish. If there are any dramas with taking paint off this is easily fixed with a bit of Humbrol No 33 (Matt Black). Obviously doing something like a Jinty or 4F (which are unlined) is a good place to start as any mistakes are more easily rectified. With a bit of practice and confidence... See Victoria earlier on this month.